The design of my old sump, which maximized the refugium, worked for me. So, I pretty much wanted the same thing for this sump.

The new sump would build on that design and add some features

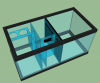
Here is my mockup of what it could look like. It adds a drain chamber, filter sock holder, and bubble trap/heater/extra media section after the skimmer.
This uses a 40g breeder. I planned to try it out with glass baffles. The local glass shop gave me a bunch of ¼” plate glass "scraps" for free, so taught myself to work with glass (youtube) and planned on glass baffles. Through practice I decent at cutting glass and even making odd holes, cutouts etc.
*Fail: Know the INSIDE dimensions of the stand before committing to a sump.
The 100g aquarium that is 48” long by 20” deep. The 40g breeder is 36” long by 18” deep. I failed to account for bracing and the trim of the stand. So a 20” deep stand has 16-17” max clearance inside.
Then I looked for a 30g long which is 36”L x 12”D. Side note, no one sells these. I did find a used one craigslist for only a few dollars. But it was old and needed to be resealed.
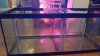
Given this, and my newfound skill at working glass (or so I thought), I decided to modify the 40g breeder to make it 14” deep.
This was a difficult, frustrating, and tedious process. During it I chipped, cracked and chewed up the panels of the aquarium.

Already damaged after just removing the black trim

*Fail: I couldn't make clean cuts for the panels.
Even though I had some success practicing, I pretty much just created a dangerous glass mess when trying cut the sides of the aquarium.
Afterward, I wasn’t confident that I’d make a solid leak-proof aquarium, so it was a waste time-wise, luckily it wasn’t that expensive… yet.
I then went to get the glass cut to size, but the quotes were more than getting acrylic, so change of plans, go all acrylic.
Lessons:
The new sump would build on that design and add some features
Here is my mockup of what it could look like. It adds a drain chamber, filter sock holder, and bubble trap/heater/extra media section after the skimmer.
This uses a 40g breeder. I planned to try it out with glass baffles. The local glass shop gave me a bunch of ¼” plate glass "scraps" for free, so taught myself to work with glass (youtube) and planned on glass baffles. Through practice I decent at cutting glass and even making odd holes, cutouts etc.
*Fail: Know the INSIDE dimensions of the stand before committing to a sump.
The 100g aquarium that is 48” long by 20” deep. The 40g breeder is 36” long by 18” deep. I failed to account for bracing and the trim of the stand. So a 20” deep stand has 16-17” max clearance inside.
Then I looked for a 30g long which is 36”L x 12”D. Side note, no one sells these. I did find a used one craigslist for only a few dollars. But it was old and needed to be resealed.
Given this, and my newfound skill at working glass (or so I thought), I decided to modify the 40g breeder to make it 14” deep.
This was a difficult, frustrating, and tedious process. During it I chipped, cracked and chewed up the panels of the aquarium.
Already damaged after just removing the black trim
*Fail: I couldn't make clean cuts for the panels.
Even though I had some success practicing, I pretty much just created a dangerous glass mess when trying cut the sides of the aquarium.
Afterward, I wasn’t confident that I’d make a solid leak-proof aquarium, so it was a waste time-wise, luckily it wasn’t that expensive… yet.
I then went to get the glass cut to size, but the quotes were more than getting acrylic, so change of plans, go all acrylic.
Lessons:
- Double, triple check all dimensions, especially inside the stand
- Taking apart glass aquariums is horrible
")