DIY Project showcase!!

My dual chamber reverse flow calcium reactor. Here's the thread http://www.bostonreefers.org/forums/showthread.php?t=59767
I hope this baby works! I'll post a pic of it in action in a few days.

DSC01858A.jpg
 
Diy 230

I have a more comprehensive build thread located somewhere in this DIY forum. But I saw this thread and though I'd post to it. Just about everything I could DIY I did, filtration room, plumbing, DT stand, sump, etc.

The set-up will be up and running for 2 full-years on December 13th.


230 DT

ONE014.jpg

ONE015.jpg

ONE016.jpg


125 sump/fuge in basement below directly DT

Aquaria001-Post.jpg

ONE0202.jpg
 
Pat

This is pretty much exactly what i was planning on doing for my next tank, but i was unsure if there was a special kind of epoxy i should look for and what silicone sealant to use. From my research, i've found that home depot carries a silicone made by DAT that claims to be aquarium safe. I was wondering how your tank is holding up and if you had any advice. Thanks!!

Alex
 
Are you asking about Pat H's plywood tank? If so, he probably wont' see this as he broke it down and IIRC sold it not too long ago. If you click on his user name on one of his posts, there will be an option to e-mail. I'd try that as I don't think he's on the board very often anymore.

You can also search for a build thread in this forum by smcnally where there was some good discussion about epoxies for use on plywood tanks.

As for silicone, Nothing at HD or lowes is really any good for building stuff. Those are all sealants. You want an industrial grade adhesive. Momentive RTV100 series silicones are commonly reccomended and can be ordered from mcmaster.com or grainger.com
 
Pat

This is pretty much exactly what i was planning on doing for my next tank, but i was unsure if there was a special kind of epoxy i should look for and what silicone sealant to use. From my research, i've found that home depot carries a silicone made by DAT that claims to be aquarium safe. I was wondering how your tank is holding up and if you had any advice. Thanks!!

Alex

Hi Alex,

I used Sweetwater epoxy from Aquatic Ecosystems in light blue. It's a little pricey with the shipping cost, but worth it for the piece of mind.

My tank ran for about 5 years, then held all of it's seawater for another year or so before being emptied. A BRS member took the tank a few months ago and has told me it is now setup and running again. I never had leaks or any other problems with the construction of that tank.

I used 4 or 5 caulking sized tubes of All-Glass Silicone Aquarium Sealant. Worked perfectly.

Advice? Well, I used ordinary plate glass. If I were to do it again, I think I'd go for the iron-free (Starfire etc) glass.

Also, I would use nice plywood. Furniture grade, and as thick as you can afford. I used 1" thick. Some of the DIY online articles say to use just ordinary plywood. While it would probably be plenty strong enough, it would require much more finish work than the furniture ply.

I didn't use ordinary screws either. I used these http://www.mcfeelys.com/product/7050-CSP/7mm-x-50mm-Connecting-Cabinet-Screw
Very heavy duty. I put them every 4" all the way around.

Anything else just ask :)

-Pat
 
Thanks all, sorry it took me so long to respond, but i have since set up a 50 gal. and thanks for the detailed description as to how you went about it. Not quite ready for the plywood tank. once i buy a house it'll be a serious project. however, i've still been researching and came across this stuff. i just figured it would save me the shipping costs as there's a sherwin williams about fifteen minutes from me that sells it.

http://protective.sherwin-williams.com/detail.jsp?A=sku-26213:product-6855
 
IMG_2843.jpg

My first hexagonal cabinet and canopy. This is for a 45 gal hex.I made it without plans because - frankly - I couldn't wrap my head around the whole hexagon thing, and I couldn't make plans. As a result, the thing took forever to build, and I used a lot of screws!

The stand is 100% solid cherry, with solid cherry frame and panel construction. I used snap-closing euro hinges on the doors, and brass overlay hinges for the canopy lid, with cork all around so the doors don't slam. The finish is three coats of General's Arm-R-Seal oil & urethane blend, which is both a sealer coat and a topcoat. I rubbed the last coat with steel wool. This is a quick, nice looking, and water-resistant finish.
 
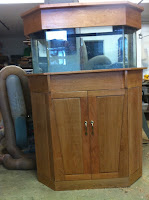
Nicely done. It will showcase you living art well.

I have found with my projects creating plans, other than the basic idea, is often wasted time for me as creating detailed drawings, schematics, etc. is not my strength. I prefer to start with my idea and usually perform a good amount of trial and error (make corrections/adjustments) as I go. So long as you are willing to back-up a few steps and redo things a few times, it is not a problem. You are right, this usually results in a lengthier project and there probably is a more waste in terms of materials. However, the satisfaction at the end is nice.

Cheers, Keith
 
DIY stand and sump

my stand! Mydoors and front trim arent done yet on the front, still working on the plumbing
tank1.jpg
tank2.jpg
my ghetto a** seams on my 20L sump
sump.jpg
 
Nice rimless!! The sump looks good too, nothing wrong with that! You'll be a pro next time you baffle a tank
 
The tank is 48x24x18, I liked the low long look too! Last tank I had was high and I didn't particularly care for the rock wall aquascaping. I figured this tank would give me a different option I think I'm gonna have to get a screen made for the top my son and I want the obligatory clown and anemone and I would hate to come home to a fish on the floor!
 
heres my plumbing! Please excuse my Vans shoelace! Its a temporary fix till I get a proper hanger from work tomorrow:p
photo.jpg
 
Upcoming Events

April 21, 2024
Paul B
Club Meeting

Back
Top