Steve's Tank Build

smcnally

Tankless
Alrighty...I have this plan rolling and I'm going to build this tank and stand from scratch. I'm going to log the whole build so hopefully everyone can learn from what I do (and maybe from my mistakes:p )

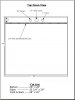
Here's the plan, I'm going to build the tank to be approximately 63 gallons. It will be 28" L x 26"D x 20"T with 3/8" glass. The back 3"to 4" of the tank will be an overflow (I'll have to add some bracing for this). I figured cutting 4" off the height would make the T5s more effective and lower the pressure on the sides of the tank (hoping to go rimless). I'm going to do a 3/4" return, a 1" durso drain, and I've decided to install another 1.5" bulkhead that will have PVC that extends just above the rim of the tank that will be a conduit for me to get all my wires from the sump to the top of the tank neatly. I will be building a short canopy that will house T5 lighting.

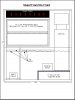
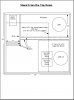
Here's the really unique part (unique in my opinion)...To maximize my water capacity, I'm going to build my stand so the bottom section is a sealed plywood sump/refugium. It will have a cubby with drawers that I can remove to do maintenance as well. The water total capacity of the setup will be just over 100 gallons.

Now for the concept drawings...Let me know what you all think.
 

Attachments

  • Front View.jpg
    Front View.jpg
    35.3 KB · Views: 3,430
  • Top Down.jpg
    Top Down.jpg
    32.7 KB · Views: 3,423
  • Stand Front View.jpg
    Stand Front View.jpg
    53 KB · Views: 3,417
  • Stand Top Down.jpg
    Stand Top Down.jpg
    44.6 KB · Views: 3,429
Wow... looks like you've been planning this for months. :eek:
Can't wait to see you actually start building this. I don't think I've seen a build quite like this. Looks like it's going to be awesome. :)
 
i wouldnt bother with the teeth on the overflow. Just have the edge of the water fall over instead of going through the teeth.
 
Why not go with an external overflow?
My goal with this whole design is to have everything contained in one smooth box. If I go with an external, the pipes will be visible.

I'd feed the skimmer off the drain and save yourself the feed pump. JMO.
I did this before and had issues, but I also had a lot more flow going through my sump. Maybe I'll try this again...

Wow... looks like you've been planning this for months. :eek:
Can't wait to see you actually start building this. I don't think I've seen a build quite like this. Looks like it's going to be awesome. :)
I pretty much started planning this last night :D

i wouldnt bother with the teeth on the overflow. Just have the edge of the water fall over instead of going through the teeth.
I'm a tooth fan. I think they help keep a lot of crap out of the drain, and if I get any small fish I like the added security.
 
You need to think outside of the box ;)
Technically I could do an external overflow that goes the whole height and width of the tank, but then I would have to make the tank smaller and it would look the same...but with a seam on the outside where the notched acrylic is going ;)
 
I haven't decided on the glass yet. It all really depends on the difference in cost for fegular glass versus low iron. The low iron glass looks great, but I've never personally looked at a tank with regular glass and thought it looked bad. As it is, the glass is going to cost me close to $300, so if it costs 2x the amount to go with low iron then I won't go with it. I'm going to have them grind the edges, but maybe not polish them. I saw a tank once like that and I thought it looked kind of neat. I've also decided to go with black silicone. Dave McReeferson hooked me up with a link for some and it is supposed to be way stronger than the standard aquarium silicone.
 
That design looks sweet. I like the streamlined look you'd get with the overflow design, hidden wiring.....

I like teeth too, but I wonder how much less they would matter with the overflow being that wide and the return flow being mild (mag 7). I'm picturing only a couple of mm of water going over that wide edge. Seems like a fish would have to be pretty darn determined to go over the top, then again there is that guy named Murphy....
 
FWIW you could always go with that glass box/wall with (or without) an acrylic shroud (as we talked about the other day).

If you did it that way, it wouldn't be very difficult to change the shroud from teeth to no teeth or vice versa (just make 2 shrouds, one with teeth, one without). The only missing question would be how high to make the glass box, but you could always go a bit low in that and make the 2 acrylic shrouds and make height corrections with the acrylic. (I'm pretty sure I could come up with a good way to make easily interchangable acrylic shrouds).

If your interested, I'm about to water test a toothless overflow with roughly 15" of surface area. I will be using a similar sized pump. LMK if your interested, I can measure the surface skim depth on that and let you know.

Also, I found one of those stickers off a bulkhead with the actual hole sizes. 3/4" needs a 1 7/16 - 1 1/2" hole, and 1" needs 1 3/4" or 1 7/8" hole. It didn't have the size for the 1.5".

jk
 
Awesome! Thanks for the info on the hole sizes. I would definitely appreciate it if you could let me know how the toothless overflow works on that setup. I'm going to call a couple of glass shops tomorrow and see what other prices I get. I forgot there is a "Settles" glass literally 1/4 of a mile from my door. It would be great if their pricing was good!
 
Best of luck, and I'll be happy to help out on the acrylic work.

jk
 
Awesome! Thanks for the info on the hole sizes. I would definitely appreciate it if you could let me know how the toothless overflow works on that setup. I'm going to call a couple of glass shops tomorrow and see what other prices I get. I forgot there is a "Settles" glass literally 1/4 of a mile from my door. It would be great if their pricing was good!

Don't count on Settles glass being cheap, however they do nice work
 
Back
Top