• ******* To read about the changes to the marketplace click here

Joe's Tank Raising and Ultimate Fishroom Thread

Hippo, Sailfin, Yellow... all around the PVC tee of course. Not a very good pic but it is unusual for me to get all three in one shot.

FYI, that hippo tang was only a few inches long when I picked it up from a fellow reefer a few years ago. It has quickly caught up to the Sailfin, which is about 10-12" long. The sailfin still wins the battle in girth but the Hippo is probably going to beat him in the length department within the next few months.

I'm going to miss having these guys in the 300g tub. It is just such a cool perspective to have on these animals. My wife has been trying to convince me to just keep the 300g tub where it is with everything in it because she likes it so much.
 

Attachments

  • 20070627 091.jpg
    20070627 091.jpg
    28.7 KB · Views: 823
Well, no sense in posting more crappy pics of a temporary setup. If I can find the time I hope to use my underwater camera rig (a 2g tank) to take some nice photos of things before they end up in the display tank never to be photographed well again... :)

Anyway, my next step is to patch the concrete floor in the sump room and once that cures, apply the epoxy sealer.

When that is dry I can double up the joists, put the beams up and get ready for the final stage of the move...getting that display back up and re-installing all the equipment in the sump room.

I may never move again. :)
 
Wow, huge job! I am actually enjoying the pics of this ordeal.

I did the same thing with GSP. I quickly got into SPS so I glued a 2X2" piece and a 2X2" of Pink Star Polyps on the overflow. Now they grew together and it actually looks really nice. I was thinking of caps or tabling type acros but it throws things off.

Good Luck with the rest.
 
Well, I finally made some more headway. I epoxied the floor using Quickrete multipurpose floor epoxy. It worked pretty well and seems to have bonded fairly well and looks fine. It sweats a bit with all the humidity in the room right now but that's ok.

I also finished doubling up the joists and installing the beams. All I can say is next time I'll listen to the architect (thanks again Dennis!!!) rather than the voice in the back of my mind saying "you'll sleep better if you use two beams instead of one", although I probably will sleep better. The tank is definitely not going through the floor now. :)

Anyway, that whole process went pretty smoothly and I feel like I'm on the home stretch now.

Next steps include plumbing the tank (including cutting out a portion of the floor in the display room for the plumbing to the basement), doing a leak test, moving all the equipment not currently in use in my temporary setup back into the updated sump room, putting the sand in the display tank, filling the display with saltwater, moving the rock & livestock to the display, moving everything else back into the sump room...

Maybe this isn't the home stretch after all!
 
Still no pictures, but hopefully soon I'll remember to take some.

The tank is mostly plumbed, I'm in the middle of the leak test; about a third filled -- I'll finish tomorrow. A few minor annoyances but nothing major. The hole in the floor has been cut, the pumps have been cleaned.

Both the 150g rubbermaid trought tanks are in the basement and filling with RODI; about halfway there so far.

I was hoping to start doing the move on Sunday but I'm not going to have time to get everything done by then. Looks like the move will probably start Monday or Tuesday -- I may stretch the move over a few days...we'll see. I am not looking forward to lugging all that rock upstairs or the fish either.

I'm not sure I mentioned it but my hippo is not doing very well. He has been hiding virtually 100% of the time since the move and seemed to be losing body mass. I think he may have been injured in the move -- he isn't swimming right. But the last few days he's been out more and I've seen him eating regularly now that I found a way to put nori in front of his hiding place too. Hopefully he'll make it.

Anyway, I will be taking pictures soon. Hopefully it will look better than the before pictures!
 
Well, the tank has been full of saltwater and a few rocks for a few weeks now. The plumbing is all working as expected. I am still completing some of the basement plumbing but that should be done in the next few days and as soon as it is done, I will be doing the 'big move'.

I'll be posting a bunch of new pics of the entire setup soon.

I lost one of my two clams -- I don't think the 2nd one will last much longer in the current tank either...they both moved from their original rock and haven't seemed happy with any new location either. Not really sure what the problem is but the sooner I can get everything into the new permanent system the better off it will be. Hopefully Tuesday or Wednesday.

For those who hadn't heard, my mother-in-law was in a horrible car accident a few weeks back (in the middle of my honeymoon!) and that threw a wrench in plans and is why I haven't posted any updates recently. She is going to be ok though although it will be many months in rehab. Then I had my wisdom teeth pulled on Friday which was suprisingly uneventful -- I was back to doing plumbing later that same day...and most recently, late last night, I found out one of my best friend's mother just passed away in a freak accident so I'm heading down to NY for the services. If I didn't know better, I'd think someone upstairs didn't want me to get my tank back up.

Anyway, a much more detailed series of update posts will follow in the next few days.
 
Last edited:
A few days...a few weeks, what's the difference?

In any case here are some more photos. The tank has been full for a few weeks with a couple pieces of rock with not much of anything on it. Nothing other than the return pump has been operational and amazingly the stuff on the rock is still alive and the pods seems to be doing just fine...

Anyway, here is a pic of the tank, full of water... If you look back on the original pics you'll see we changed the orientation of the tank. Now that it is rotated, the room feels much larger. There is still a good 2-2.5' of space between the far wall and the length of the tank so viewing is from that side is fine.

You'll also see the temporary PVC framing that I'm using to mount the lights above the tank. I'm going to be framing the existing steel stand out and building a new actuator controlled canopy for the lighting but that is going to take a while and I wanted to get the move over with (it is happening TOMORROW!). Right now the PVC framing is only supporting one lumenarc but I'm going to put a second one over it once the rock is in place.

The actuator controlled canopy will allow me to raise and lower the canopy from the top of the tank to the ceiling which should give me plenty of room to get into the tank from all sides. My old system to move the canopy was based on pulleys, a winch, and the two slats used for sliding doors -- it was functional but freakin' ugly as sin. My new system should be pretty cool. Steve's thread showed me the light (and he's been very helpful/encouraging as well). :-)

Oh, and you'll also note the tank stand is currently on a green blanket which is under a brown and silver tarp. I put those under the stand when we first moved the tank in because it allowed me to move the tank around the room myself -- the blanket lets it slide pretty easily. But the more I thought about it, the more it made sense to just leave it there. The tarp above the blanket has already helped me deal with a few spills so I think it was a good decision. It will obviously be hidden by the stand once it is framed out.
 

Attachments

  • display-interior-corner-sho.jpg
    display-interior-corner-sho.jpg
    40.6 KB · Views: 459
This is a shot looking down the length of the tank...no really much to see here -- doesn't look like a 6' x 3' tank from this view! The reason I uploaded it was to show the outlets of the closed loop a bit closer up.

You can see there are two rocks in the tank...each one is on top of two outlets of a closed loop. The outlets are each tee'd and direct water up and towards the side of the glass. I glued sand and calcium reactor media to the PVC to hide it a bit...it worked out pretty well, not perfect but much less noticeable.
 

Attachments

  • display-length-shot.jpg
    display-length-shot.jpg
    34.1 KB · Views: 464
I took this photo standing on the deck, just outside the slider leading into the room. The rest of the house is to the right, the door on the other side leads out to the side driveway.

You can see a bit more of my old canopy on the right side of the photo -- three lumenarcs with 400w bulbs, which is what the new canopy will also have I think, although I'm tempted to try to get away with just two lamps.

You can see my reflection in the tank...I'm six feet tall so it provides a little perspective. I'll make sure I take some photos with people in the shot once I get the stuff in the tank...as should be abundantly clear by now, I am not a photographer.
 

Attachments

  • display-porch-side.jpg
    display-porch-side.jpg
    42.2 KB · Views: 447
This is what it looks like under the tank.

The closed loop is supplied from (2) 1.5" bulkheads in the overflow compartment. They are teed together, hit a ball valve, a union and then the ampmaster 3000, then up to another union, ball valve, tee where they are then plumbed back into the tank (and then tee'd again in the tank). The flow is solid but not overwhelming which is exactly what I was going for...

I used 2 bulkheads to feed the pump as a precaution...if someone one is blocked, the other will still keep the pump fed.

FYI, I put a plastic mesh inside the tees used in the display tank to prevent critters from making it down to the pump. Between the current coming out of the pipe and the mesh, I'm pretty confident nothing will work its way back to the pump even when it is turned off (which should only be for maintenance).

The intakes will also have strainers on them but that isn't in place just yet.

Well, that explains two of the five tubes coming out of the bottom of the overflow...

The pipes on the far ends (furthest left and right) are both 2" drains to the basement. I'm all about redundancy. I'm not sure what could clog a 2" drain but I'm sure I have things that could...and would if I didn't have a backup.

The middle pipe with the ball valve pointing straight toward us is the return from the hammerhead pump in the basement. The hammerhead is a 2" pump but I felt safer using the 2" holes for drains and also didn't feel I needed the full flow from the hammerhead going upstairs, so just beneath that ball valve there is a 2" -> 1.5" reducer.

Both of the drains have ball valves on them more for convenience during initial setup than anything else. I may try to use them to silence the system or I may just leave them wide open.

The closed loop pump is sitting on a stand (that is wrapped in plastic to hopefully prevent decay) which is contained in a rubbermaid clothes storage tub. If there are leaks or when I'm doing pump maintenance, the tub should help contain the mess.

All in all, it is much cleaner than my old setup which had my sump, calcium reactor, nilsen reactor, aquacontroller and various other things under there!
 

Attachments

  • display-stand-plumbing.jpg
    display-stand-plumbing.jpg
    46.8 KB · Views: 462
I'll be taking more pics of the newly redone sump room later and hopefully post them tomorrow before I start the actual livestock move.
 
This has come a LONG way from when I saw it empty a few months ago. Nice work Joe, keep the photos coming.....it's something for us ghetto reefers to strive for :D
 
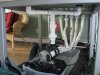
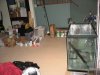
Ok, this is the 'new' sump room...granted, not all the equipment is in here yet and I'll not doubt make it messy soon enough, but it is a big improvement over where it started.

The epoxy on the floor has already helped me clean up several spills very conveniently via the shop-vac.

Ok, left to right description of the room:

You can see the return pump along the left wall. It is fed from a 2" pip that connects to the middle 150g rubbermaid stock tank. That middle tank has four 2" bulkheads: 1 to the return pump, one from the corner 150g stock tank (which is going to be my QT tank) and the other two were going to connect to the overflows from the 300g stock tank although I may decide not to use that after all, we'll see.

The return pump goes upstairs, reduces to 1.5" pipe before entering the overflow area of the display tank at which point it hits an 'octopus' which splits the flow into eight 3/4" tubes. Just before it goes between floors though, you'll note a ball valve that connects to a pipe that currently goes to the corner 150g stock tank. I will likely divert some of the flow from the return pump back into the corner 150g tank via this piping.

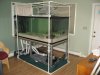
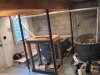
In front of the middle 150g stock tank is the stand for my custom 95g tank. This will be the 'surgugium'. Basically, it will contain multiple surge devices and double as a refugium. It will dump its contents into the middle 150g and the 300g if I decide to put that up. If I don't end up using the 300g stock tank then I may decide to make this 95g tank into a specimen tank and keep something interesting in there instead. We'll see.

The two 2" drains come down and currently dump into the middle 150g tank. Eventually these will dump into the 95g tank on that wooden stand (and then either surge or overflow into the middle 150g and the 300g stock tanks).

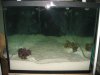
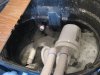
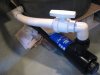
On the right side of the pic is the corner 150g stock tank which will be my long-term QT tank. This will be plumbed into the main system so that I don't have to manage a completely separate system. All water exiting this corner 150g tank flows through a commercial UV system (150w) that is rated to kill basically everything smaller than a human. :)

I'm still not 100% sure I am comfortable with the concept of relying upon the UV system like that but we'll see. I still plan on using a completely separate QT environment for the first day or two when I'll apply medications and whatnot to corals and do the up close visual inspection for bugs and whatnot...but after that brief time I'll put them in this QT system for six or so weeks. At least, that is the plan.

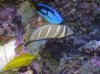
Once they pass the tests there, I'll either move them to the 300g grow out stock tank or just move them straight up to the display if they are ready.

There will be a single 400w MH lamp above each of the stock tanks (both 150g and the 300g), each lamp will be housed in a lumenarc reflector. I may end up putting two over the 300g and not light the middle 150g...or I may just build a light rail/arm of some sort.

You can make out the end of the UV system in the bottom right corner -- the power supply for it is sitting on top of concrete blocks and the actual device is underneath the corner 150g and extends all the way to the wall. You can see the PVC plumbing (2") that enters the intake of the UV system...and then more 2" PVC that attaches the output from the UV to the middle 150g.

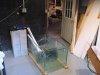
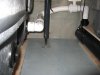
There is about 16" of minimum (at the top of the tubs) between the middle 150g and the corner 150g as well as the return pump stand. There is plenty of space to work there although you certainly can't throw a party there. All the tanks/equipment are off the floor -- all the stock tanks and the return pump (and sump when it gets rebuilt) are on plywood -> concrete blocks -> plywood. I lost too much heat through the floor last year plus, the additional height will make it a ton easier to work inside the tanks. It is the perfect height; any higher and I wouldn't have been able to reach the bottom of the tanks conveniently.

Not really a whole lot more to say about it. I had to reframe the exterior wall which took a lot more work than I expected. I was bored and frustrated with various things by the time I put the greenboard up so I didn't do a very good job and still haven't gotten around to sealing the joints and whatnot...but it is still a heck of a lot better than what had been there before.

I added in a ton of recessed lighting so it is bright everywhere in the room now which is a huge help, especially since the two new beams I installed are so darn big they block most of the light from the previously existing fixture.

I lined the ceiling with 6 mil plastic which seems to be working out just fine so far. I also used some to line the wall by the corner tank -- I'm not sure I'll keep that there but I wanted to at least have a splash guard around the tanks and it seems to be working well so far so I may keep it. I'm just worried about trapping moisture behind the plastic so if I notice that, I'll change plans.
 

Attachments

  • sump-room-from-interior-doo.jpg
    sump-room-from-interior-doo.jpg
    52.3 KB · Views: 450
Ok, so this may not be as good as a real skimmer but the output from my 2" drains generates and awful lot of foam all by itself!

Eventually these drains will go into the 95g surge tank. For now I just have them emptying into the middle 150g. You can see the plumbing for the intake of the return pump toward the bottom left. Directly above that is the bulkhead connected to the outlet of the UV system. There are also two more bulkheads just to the right of each of these.

I was having all sorts of bubble/noise/splashing issues so I just threw a bunch of tees onto the drains and pointed them mostly up and toward the right side which really helped a lot. I'll work on something more permanent later but it eliminated most of the bubbles, noise and splashing.

Once I get my sump fixed this will become my primary refugium. I may also make it an aiptasia farm if I can convince myself there isn't any risk that those suckers would find their way up into the display.
 

Attachments

  • middle-150g.jpg
    middle-150g.jpg
    50.4 KB · Views: 408
This is my broken sump. It holds about 100g. It is hard to see in this photo but the left side panel is cracked towards the bottom of this pic. I have the replacement glass for it but I'm having a hard time getting the existing piece off and it hasn't been a terribly high priority for me. Eventually this will go on the same platform as the return pump -- it fits perfectly from where the pump is to the wall. The middle 150g will then overflow into this tank which will feed the return pump.

I'll likely put my in-sump Euroreef in this glass sump once it is fixed.

The area in this photo is also roughly where the 300g trough 'grow-out' tank would go. It will be centered in the room so that I can completely walk around it. The thing is so big though that it will dominate the rest of the space in that room. I'm not sure it really makes sense to do that. And I could just use the corner 150g as a unified QT/grow out tank anyway. We'll see.
 

Attachments

  • sump.jpg
    sump.jpg
    46.3 KB · Views: 413
This is a better shot of the broken glass pane in the sump...

If anyone knows a convenient way to remove silicon -- or otherwise remove this broken pane of glass from the tank -- please chime in! Right now the best luck I've had is with very fine wire and just working it down the seams. Unfortunately, it keeps breaking and it generally a royal PITA. I got about halfway down the seams of all the panels before I backburnered the project.
 

Attachments

  • sump-break.jpg
    sump-break.jpg
    36.8 KB · Views: 442
On the right side of this photo you can see the 95g tank I hope to use as my 'surgugium'. It has four 1.5" bulkheads...not as big as you'd ideally want for a big surge device but hopefully good enough.

Just behind that you can barely make out my calc reactor and the CO2 tank, some two-part and mag additives I mixed up, and a bunch of left-over stuff I haven't put to use yet (plumbing fixtures, bags of sand...). Someday soon I hope my basement proper will be completely empty again so I can refinish it...but for now, it is basically the tank workshop.
 

Attachments

  • surgugium-tank.jpg
    surgugium-tank.jpg
    43.9 KB · Views: 435
These photos show the UV a bit more upclose, one show the intake while the other shows the outlet. It is 150w, about 6' long. That is 2" plumbing connecting to it. The manufacturer claims it will kill protozoan sized creatures with flow rates up to 1600gph at the end of the 13 month bulb life (and much larger things before that!).

I bought the thing in a panic a few years ago and never ended up even hooking the thing up. I figure it can't really hurt and, if this QT concept works it should make my life a bit easier. If nothing else, I think it will help clear the water.

I haven't implemented an ozone system yet but based on what I've read, I think I may head that route in the future.
 

Attachments

  • uv-intake.jpg
    uv-intake.jpg
    39.3 KB · Views: 452
  • uv-outlet.jpg
    uv-outlet.jpg
    31.7 KB · Views: 435
Back
Top