Lookin' good Barry! I still have that flat piece for you too. Give me a call when you're ready for a hand.
You are using an out of date browser. It may not display this or other websites correctly.
You should upgrade or use an alternative browser.
You should upgrade or use an alternative browser.
Crib's 210g Build
- Thread starter Crib
- Start date
OP
OP
wait do i see 2 tv's in the same room????? thats sweet!
Good Eye, that is what I appreciate here on this forum a keen eye to see many things.
Let that be a fair warning for those that post pictures.
Oh ya,that is 2 TV's 55" and 60"
60"LCD good price..or trade
OP
OP
You are the man.Hey Barry! Welcome back! LMK when you're ready for Chalices again... I've got you covered")
Thank you I will be looking you back up.

OP
OP
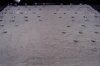
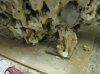
I then laid out the acrylic based and made pencil marks on the table top as to the approximate location for where the bases would sit. (I know it will never be perfect but an outline is good enough.)
I started with the idea that the rods would support the rock weight using Weldon and later switched to adding another small 2”X2” piece of acrylic on top of the base which gave me more depth to drill thru and secure the rods for the rock to be placed thru and secured.
I started with the idea that the rods would support the rock weight using Weldon and later switched to adding another small 2”X2” piece of acrylic on top of the base which gave me more depth to drill thru and secure the rods for the rock to be placed thru and secured.
Attachments

Good Eye, that is what I appreciate here on this forum a keen eye to see many things.
Let that be a fair warning for those that post pictures.
Oh ya,that is 2 TV's 55" and 60"
60"LCD good price..or trade
ohh so you upgraded... thought i was going to have to buy 2 more tv's to beat you
and loving the tank
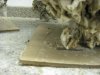
Going to be a great project, I am just setting back up as well and it is always fun. I have an acryilic rod set up as well that is a bit different and allows you to rearrange the pegs to work with any changes in aquascape. Can also vahe different size rods to put shorter ones in viewable areas. In case you haven't gotten to far and are open to other ideas.
There are just holes drilled in the top strips of the acrylic base that the rods slide into. No glueing so you can change it any time. Obviously it is a pain once sand is in the tank but still doable if needed.
There are just holes drilled in the top strips of the acrylic base that the rods slide into. No glueing so you can change it any time. Obviously it is a pain once sand is in the tank but still doable if needed.
Attachments


OP
OP
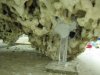
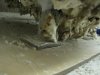
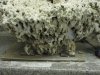
a few pictures of how I covered the acrylic rods and 2 part putty at the base (Not that the sand bed wouldn't cover the base on it's own),I used epoxy glue and attached the rubble and powder from drilling the rock while the epoxy was setting up.
Attachments
I love new builds....After being in the tank I got for close to 7 years now....I miss that new....(not the break in or anything like that...Just all the new stuff!!)I didn't use any rods....But all my rocks were very very large....One weighed in at close to 80 lbs...Keep up the good work.....Pics & updates are nice...
OP
OP
I will remove the film prior to the curing process.well thought out looks really good i was just wondering when u were going 2 take the film paper off the acrilic
OP
OP
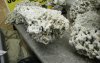
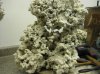
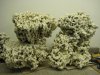
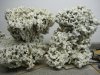
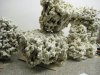
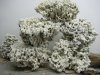
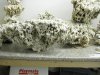
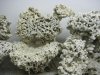
Here are more pictures of the the future lay out. (in a perfect world) ::
I had enough rock to play with so many rock formation possibilities it never ended. You can keep coming up with idea after idea.
After resting this top rock atop of the other bases, I realized that this would be way to tall for future SPS growth.. I tried to keep my height no taller than 20"-22". I went with a bridge effect instead.
Attachments

Here are more pictures of the the future lay out. (in a perfect world) ::
I had enough rock to play with so many rock formation possibilities it never ended. You can keep coming up with idea after idea.
After resting this top rock atop of the other bases, I realized that this would be way to tall for future SPS growth.. I tried to keep my height no taller than 20"-22". I went with a bridge effect instead.
If you had a deep tank you could go two or three rocks deep & have the one in the sandwich taller than the two on front & rear...
(that is what rocks about a deep tank!!)
I think the later is a better choice for you...
Similar threads
- Replies
- 8
- Views
- 3K
