40g Breeder Frag Build

Kens Bees

Well-Known Member
BRS Member
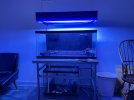
This is my first time building from scratch so I wanted to share. I really wanted a frag tank to grow some corals and start playing with those getting too big in my display. It was also a good excuse to get a project going. DIY is a blast and this is going to be about as DIY as you can get. I picked the 40 because it's 36" long and I had a pair of Current LED fixtures from my first tank.

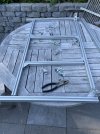
So, I got a Petco 40g breeder and drilled it myself. I have a drill press and felt a lot better about using that than trying to hold a drill in place by hand. Drilling was pretty painless, loud, but painless. A new modular marine overflow and a return went on in a little less than an afternoon.
 

Attachments

  • IMG_4869[1].JPG
    IMG_4869[1].JPG
    156.8 KB · Views: 144
  • IMG_4878[1].JPG
    IMG_4878[1].JPG
    269 KB · Views: 147
  • IMG_4877[1].JPG
    IMG_4877[1].JPG
    206.9 KB · Views: 142
  • IMG_4873[1].JPG
    IMG_4873[1].JPG
    184.5 KB · Views: 151
Last edited:
Finished the lights this morning. The frame is 1" aluminum and will be hung. I had the Current LED's and got an ebay 4 bulb T5 fixture. I finished it off with some dark blue plexi as a canopy that just lets some light through. The led's are programmable so I plan to use them for sunrise/sunset and have the T5's come on for a few hours mid-day. Really noit sure what t5's to use in this but have plenty of time to figure it out. I was really happy with the way this turned out.
 

Attachments

  • IMG_4902[1].JPG
    IMG_4902[1].JPG
    113.6 KB · Views: 140
  • IMG_4903[1].JPG
    IMG_4903[1].JPG
    301.7 KB · Views: 147
  • IMG_4904[1].JPG
    IMG_4904[1].JPG
    74.3 KB · Views: 140
  • IMG_4905[1].JPG
    IMG_4905[1].JPG
    109.1 KB · Views: 130
  • IMG_4906[1].JPG
    IMG_4906[1].JPG
    107.2 KB · Views: 139
It took a while for the right connectors to come in but I started building the stand last night. The picture is what will be the top of the stand. I built in room for a shelf in front of the tank for tools and stuff. The extrusion is 25mm and the plan is to skin it with the same plastic as the light. This was more fun than the scheduled water change ;)
 

Attachments

  • stand.jpg
    stand.jpg
    212.4 KB · Views: 118
It took a while for the right connectors to come in but I started building the stand last night. The picture is what will be the top of the stand. I built in room for a shelf in front of the tank for tools and stuff. The extrusion is 25mm and the plan is to skin it with the same plastic as the light. This was more fun than the scheduled water change ;)
How do you like building with extruded aluminum? Did you buy everything pre-cut?
 
I like working with it. I bought it in 13' lengths from Grainger and cut it myself with an aluminum blad on the chop saw. The bad part about it is that if you don't slip in a connector where you think you might need one you pretty much have to take the whole thing apart to fix. They make roll-in fasteners which probably work great for this, but they aren't what I bought. So, it comes apart tonight so I can put in brackets to support the plywood base for the tank and sump.

I can sleep pretty good with the build though. The stuff is really strong and with fasteners on each joint there is no play or wiggle at all.

I've never seen extruded aluminum in person, let alone used it for a build. In the past I've always built stands with doubled up two by fours, which LOOK beefier, but of course wood and aluminum are different beasts.

Sometimes when people put massive tanks extruded aluminum built stands, it sort of plays with my mind. I know that it's more sturdy than a wood stand and the aluminum bars can hold way more weight than I am used to, based on the expectations set by previous wood builds. Just sort of blows my mind.

I kinda want to try one on my next build.
 
I got the plywood sized and cut tonight and got the levelling feet in place. My plan is to cover the plywood with linoleum to keep it waterproof-ish.

@ChrisV I'd recommend going with a larger series of 8020. The 25mm I used is plenty strong but I think a double like 25x50mm would build in a lot more stability. You can always go SAE which is probably easier.
 

Attachments

  • IMG_4941[1].JPG
    IMG_4941[1].JPG
    166.2 KB · Views: 125
  • IMG_4940[1].JPG
    IMG_4940[1].JPG
    144.5 KB · Views: 125
  • IMG_4939[1].JPG
    IMG_4939[1].JPG
    175.1 KB · Views: 129
I reinforced the stand with a few cross pieces but I can still slide the sump out if needed. Waiting on a timer for the t5's and an inkbird controller. I want to skin the stand eventually with the same plexi as the canopy. If everything goes as planned I'll start making water tonight and filling the tank this week.
 

Attachments

  • IMG_4973.JPG
    IMG_4973.JPG
    128.1 KB · Views: 109
I built a similar stand using steel. I was worried about the long term salt creep and corrosion and ended up lining the inside of it with PVC sheet I found at home depot. If you cut it accurately on a table saw you can use the same PVC glue for plumbing and make a pan that will prevent leaking on the floor. Saved me from disaster more than once!....lol
so easy to clean too!
 
Can I ask what the cost came out to for all the T bar and hardware?
I'd guess around $400-450. I chose the 25mm stock, which ends up having the least amount of options for fittings and hardware. If I did it again I'd use a larger profile like 40 or 45mm. Grainger had a lot but there's other suppliers that have a better/cheaper selection.
 
Looking for some advice on a skimmer for this build. The sump is a 20 gallon high so the overall volume is probably fifty gallons. No fish, at least at first since I’m taking live rock from my display tank sump to get the cycle going.

So I’m thinking smaller skimmer, quiet, that can handle the bio load of a lightly stocked frag tank. Very welcome to suggestions from the more experienced members.
Have you considered going skimmerless?
 
I didn't. What's been your experience?

I'm actually running two tanks without skimmers right now. No filter socks either. The quietest skimmer is no skimmer at all. I use chemipure blue from time to time, but not religiously. It's the wild west over here.

No algae problems or nutrient issues. Corals look pretty happy to me. Lots of growth and color. I speculate that I have lots of bacteria growing in my water that are not being taken out by my skimmer and therefore that my sps are fed in part by free floating bacteria.

I am not sure, but I suspect that this approach works better when you have mature live rock. Could be in a sump if this is planned to be a frag tank.

I should say that I'm not anti-skimmer, I just don't have a big fish load in these tanks and don't really need one. In the past I've used aquac remora skimmers and aquamax hob1 (or maybe 1.5?) skimmers, which work well enough. They are both hang on back models. Overall I prefer skimmers that are in a sump.
 
I have an Aquamax 1.5 hanging on my sump and I would not hang that on a DT. Too loud and too many bubbles with the effluent. Love it in the sump though
 
So no socks, no skimmer. I’m guessing that any extra coral foods will make it to the sump and get eaten up by bacteria and micro cleanup crews on the LR. I’m not planning on any fish in here so most bio load would come from overfeeding. I have a few pounds of live rock in my display sump I planned to move over, maybe I’ll just keep seeding more in there since the tank is pretty well established. Or just buy a few pounds and get on with things.

I like this idea, especially since my sump is a 20g deep. I can extend the dividers and put live rock, bricks, rings and all kinds of good habitat in there. Nice idea.
 
Back
Top