DIY Dry Live Rock Party

~Flighty~

Now with more baby
Any interest in a DIY dry live rock party?

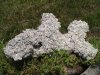
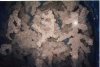
With all of the talk about seeding dry rock, I think I'm going to try my hand at making the cement and oyster shell live rock. This article http://www.geocities.com/CapeCanaveral/Hangar/6279/RaiseCementRock.html has good plans and pictures. I tried to attach a pic, but go to the website and scroll down about halfway if it doesn't work.

I would love to hear feedback of anyone who has tried it. Rock for $0.09 per lb. is worth a try. Coral propegators could also make a zillion custom plugs with holes or forks or whatever.

If anyone is interested in trying this with me, or just drinking beer and laughing at us we could make it a party. I have a 100g stock tank that I will use to cure the stuff (it takes at least 5 weeks in fresh water to make it not change the ph of your tank). The ingredients are rediculously cheep and I can get them at Home Depot and Agway.
 

Attachments

  • DIY_LR.jpg
    DIY_LR.jpg
    42.7 KB · Views: 1,762
I've done it before following Garf.org methods. Check that sight out if you haven't. It worked great. You can make any shapes you want -caves, arches, tables....whatever. I plan to do it on my next large tank (which is still a bit away I think unfortunately. :)
 
Sounds like a lot of fun, wish you were closer. The rock looks great, makes me want to try some for a future redesign of my tank. Take some pictures and keep us posted.

Regards,

Jim
 
I've made a bunch of rock before. It is easy and fun. I'll be happy come to the rock party and lend a hand.

Do remember to wear rubber gloves or your hands will be peeling for a while and that doesn't feel too good.
 
Those rocks look pretty good. How do you get sufficient strength in the shapes shown though I wonder? Where will you get the oyster shell?
 
You can buy 50 pound (or bigger) bags of crushed oyster shells at any feed store such as agway. It is used as a supplement in chicken feed and for other animals, Also used to buffer soil sometimes.
 
I tried teh GARF method what seems like a hundred years ago. Getting big slabs of impermeable rocks is easy. Big rocks with one or two little holes . . . easy. Cool looking crap like the ones in that picture that dont break when you pick them up . . . I couldnt do it. Doesnt mean you cant do it just telling you I didnt succeed.

Also don't forget that this stuff needs to cure for quite awhile before you can put it in a tank. After 3 weeks in a trough of circulating freshwater the pH of the water was still coming up over 11. I've heard vinegar speeds the process but then to me acids and concrete dont mix if you're looking for strength so TIFWIW.
 
Agreed, the lacey rocks pictured would not be possible with the Garf method (or any other method with portland cement or similar I doubt). You need to make them beefy enough to so that they don't break apart. You need to experiment a bit with the consistency of the cement when mixing to get the strength you need. It is not foolproof, but still some cool shapes can be made when you get the hang of it.
 
Shroom King said:
Agreed, the lacey rocks pictured would not be possible with the Garf method (or any other method with portland cement or similar I doubt). You need to make them beefy enough to so that they don't break apart. You need to experiment a bit with the consistency of the cement when mixing to get the strength you need. It is not foolproof, but still some cool shapes can be made when you get the hang of it.

The rock in the picture is from the garf site. It was done by making a mold out of wet oystershell sand and pouring in a 1 to 5 mix of cement and oyster. How long did you let them set up before you moved the rock you made? They recomend letting them set two days(I think, I read the article a few days ago) before taking out of the mold so that little cracks don't form. They have lots of suggestions for making little tunnles and caves, like putting pasta in the mix and letting it disolve leaving tunnles.

I have a 100 gallon stock tank for curing that I won't need for a few months,so the recomended 6-8 weeks in freash water is no problem. Water changes are easy too, because the tank is in the garrage next to a hose.

I don't know how it will turn out, but for the cost savings at the least you could make rock as porous and with shapes like $5 a lb store bought rock. Even if the tonga branch type doesn't work, you can still get some neet shapes.
 
RobboT said:
Also don't forget that this stuff needs to cure for quite awhile before you can put it in a tank. After 3 weeks in a trough of circulating freshwater the pH of the water was still coming up over 11. I've heard vinegar speeds the process but then to me acids and concrete dont mix if you're looking for strength so TIFWIW.

How often did you change the freash water? You need to do that to keep the ph low enough for more kalk to come out. They also say that the curring will take longer than 3 weeks. 6-8 weeks is better.
 
I left some in the mold for 24 hrs, and some 48 hrs. Longer is better for sure when you are talking DYI rock :p . I had some break apart when I took them out to soon (patience is a virtue). I mixed aragonite and red sea scallop shells together when I did mine. You should be careful when you remove them from the sand molds. They will also continue to harden when you are curing them for PH in the water. I still can see those long unsupported staghorn like ends like those in the picture being difficult to keep from breaking, so keep that in mind with your shapes. Make more than you need, and if some break you will still have enough. You can always mix it with other natural rock as well if you end up with less than you need. Its a fun project regardless.
 
I changed the water weekly, and left them in for about 7 weeks until the PH readings were within range. Supposedly, the more you change the water the less time it takes, but you are still talking several weeks. The PH test will tell you when it is safe.
 
Ok, I got a little worried with people saying that it didn't work for them, so I made a little batch. I just did one rock and I think I would make the "batter" a little thicker next time (or maybe use a mold of some sort) because the shape flattened a little from what I was shooting for. But I think it came out great! I don't think I could break it if I tried without a hammer. It is very light for the size. I'll let you judge, here are some pics:
 

Attachments

  • diyRock1.JPG
    diyRock1.JPG
    41.5 KB · Views: 557
Last edited:
Back
Top