I usually try to add some helpful comment or question when I see a good DIY thread so I can share my experience and hopefully contribute something to the project. So, umm, yea, um...... umm, umm.... OK I've got nothing
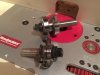
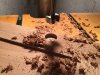
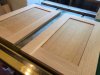
The doors I'm going to make for this project are a panel type a ply panel is held in place by a frame the horizontal pieces of the frame called "Rails" and the vertical pieces called "Stiles". A very common way to mill these to the required profile is the use of a cutter set used in conjunction with a router table for my doors this is the method used though with the simple Mission style profile not requiring an "Ogee" type cut they could have been done entirely on the table saw. I start with the horizontal pieces or rails using the rail cutter from the two piece cutter set which for my doors just cuts a simple tenon the correct size to fit the stiles. An important point here is that this cut is made across the grain and at the exit end of the cut the grain will "tear out" leaving an ugly last 1/8 inch or so, this can be greatly reduced by using a backing board at this end of the cut. The way I always do rails is by making them from a wide board and ripping them to the desired width after by cutting off the stock with the tear out, the wide board also makes the cut more stable with more stock against the fence, I sometimes can get two rails from one wide board. Next the cutter is changed and the profile is milled on the stiles, with no end grain to deal with and longer stock guiding against the fence its a pretty easy cut to make. I then cut the panel to size and sand it as it will be much easier now than when its in the door, I now have a door kit ready for glue up. The hinges I use are Euro-style that require a cup hole be drilled in the stiles a little locating fixture is available that makes this much easier to do. When I was doing my boat over I found these hinges in stainless steel but I don't recall from who, these are not stainless but the nickel plate is nice and heavy hopefully will hold up to the salty sump.
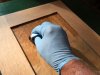
Time to apply a finish to the tank base, I use a procedure outlined by Jeff Jewitt who in woodworking circles is the wood finishing guru, this procedure is designed to replicate original Mission Oak finishes but has application to most other finishes. The piece is first sanded with 100 grit sandpaper followed by 120 then 150 then wiped with distilled water (RO is great) which will raise the grain, when dry sand with 180. Next you want to remove all the dust from the pores (a shop vacuum works great for this) and apply a water based dye this dye will give a base color to a wipe on stain added later. After the water based stain has dried it should be rubbed down lightly with maroon synthetic steel wool and coated with a wood stain conditioner. The piece is then rubbed down with a gel stain using a soft brush or soft cloth I prefer the cloth this step emphases the pores of the wood while letting the original stained coat show through, its a beautiful look. Finally three coats of a wipe on finish and your done. If anyone wants an original transcript of Jeffs procedure I can give you the information.
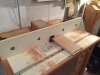
The following picture shows a mullion being added to the right hand door as a center support is not being used.
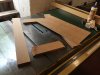
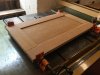
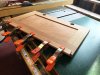
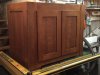
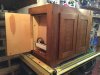
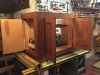
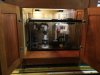
Few pictures after finish work and dry run of the sump. Need to pick up some suitable door pulls and I just picked up a butcher block top that was removed from a house in New Bedford I'll be recutting and refinishing it for the top.
")