Who has plumbed a water changing system in their basement from the sump/refugium or under the tank? Looking to see who has done this either manual or electronic? Pictures would be great. I am building my sump and refugium in the basement and the last part of the plumbing is to figure out the best way from my return to pump out 10% to 15%, approx 25 gals into the drain near the washing machine. Ideal to close a valve and drain water then open another and pump back to sump and refugium from pre-made salt water in my 55 gal drum. The new tank changes how I used to water change when I'd drain from the display tank and pump up from 55 gal drum.
You are using an out of date browser. It may not display this or other websites correctly.
You should upgrade or use an alternative browser.
You should upgrade or use an alternative browser.
Who has plumbed a quick water change into their system?
- Thread starter Leroy
- Start date
I just finished one this weekend.... I have not gone live with it because I have yet to go "live" with the tank. Here is how mine works:
I drain from the tank, the are two drain outputs, one into a 35 gal tanks, the other into a 75 gallon sump/fuge. The water will primarily go into the 35g tank and overflow into the 75. (everything is connected with ball valves)
When I want to do a change, I close off the 35g tank and let all the overflow go into the sump. I then pump the 35 g tank into the sink and refill with RODI. I add my salt, mix and heat for a couple days. When this tank matches the main tank I put it back into the system by open the tank back into the main system flow. Water change done.
Or at least that is how I plan on it working!
I built my system with 1/2. I have a drain valve off my closed-loop drain line. I use a 15gal carboy to mix my water at the tank (I have no space near the tank to keep a change bucket). When the new water is ready (temp & salinity) I put the RKE on standby (which stops the pumps) and the water back-siphons into the sump to a predetermined design level. Once it reaches that 'pumps-off' level I open the drain valve and drain the DT down to a predetermined level. Once it's there I shutoff the drain valve, move the output tube of the water change recirculating pump into the sump and once the sump level is near the top tap the RKE button to go off standby and restart pumps. I usually have to pause the pumps again to let the water transfer catch-up but once all the water is trasfered just hav to drain a little bit to get the water level in the sump to the 'normally operating' level.
I have a set up like this, for the same reasons you mentioned, I didn’t want to lift buckets or use a siphon and get mouthfuls of salt water any more.
Mine is pretty simple and straight forward.
I have (2) 55gal barrels that I mix new salt water in or use collected saltwater or a mix of both. I have a 30 gal sump with a single 1 1/2 drain running to it. as the water in the 4' or so of pvc from the ceiling in the basement to the sump it goes as follows:
First a "T" off of that T is a ball valve that runs to a utility sink drain with 1/2" garden hose. I went with hose because its was only $8 for 50', much cheaper than the other soft tubing and its drain so it doesn't matter what it is made of.
Next in line is a true union ball valve on the 1 1/2" pvc.
After that another "T" set up the same as the first one. This one is the line that pumps NSW to the sump. I have a quietone 3000 in the 55 gal barrel with 3/4" soft black tubing.
A few side notes: I have an ATO with the float valve in the return section of the sump, when I do a wc I turn the ATO off and pull the float valve out (It was fully submerged once and did not work properly for a day or so till it dried out). Since my sump is on the smaller side (trying to keep heat loss at a minimum because the basement get pretty cold) I have a hole drilled about 1 1/2" down and run a line to the drain to prevent a sump overflow if there happens to be a power outage.
How it works:
First I turn the quiteone on to get the water pressure in the NSW line. Next open the upper ball valve off the first "T" to let water flow to the drain. After that, close the true union ball valve on the 1 1/2" tank to sump drain line. Then open up the NSW ball valve. Since the quiteone and my return pump (gen-x 40) pump at different rates I have to watch the water level in the return section and very the output of the NSW line. Once I have changed about 20-30 gal, close the drain/NSW lines and open the main sump to drain back up. I will top off NSW so the return section in the sump is back at the level I want it and place my ATO float valve back in. All in it takes about 5-7 min to complete and there is no lifting of buckets. After having this luxury I don't think I could go back to buckets with a large system.
HTH, I can try and post some pics if you would like (will be a few days).
I have a basement sump/refugium/frag setup. My total water volume is around 250 gallons.
When I am ready to do a water change I drain my 35 gallon RO tank to a 35 gallon drum, where I mix salt water using a mag pump. Sometimes I even heat it.
I have a ball valve I turn on the return line that sends water to waste. When I reach a certain mark on the sump I close the valve. I then put a hose on the mag pump so it starts filling the sump, instead of mixing water. Only take a few minutes, and much better than spilling saltwater on my hardwood floor.
Mine isn't live yet, but almost. Tank drains through a diverter valve into a 20 gallon acrylic tank and from there into another 20 gallon acrylic tank that also happens to have my skimmer in it. From that tank, it overflows down into the basement to the main sump, although that's not important. The 2nd tank could just be your sump.
So anyhow, the deal with that first 20 gallon tank is that it has a half inch drain hole in the bottom that is normally closed. When I want to do water change, I just switch the diverter value so the water flows the other way, which is directly into the 2nd 20 gallon tank (or your sump or whatever).
This isolates about 15 gallons without affecting the water level in the rest of the system. Then I just open the drain, close it back up, and mix a new batch. When it's ready I'll just switch the diverter value back so the first 20 gallon tank is now part of the system again.
I'm too risk-averse to go automated, although I've seen some people over on the digital aquatics forums that were going to try a 2-channel peristaltic pump for a continuous change system.
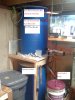
Ok, lets see if I can make sense of my setup. I've attached some hasty pics and hope I get my point across.
Pic #1
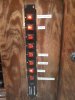
First, RO water is automatically delivered in my 55gal top barrel. When its time for water change, I mix saltwater in the bottom barrel. To mix and heat the newly made saltwater, there is a rio1700 and a heater controlled by a switch (switch #1 in Pic #4). When I'm ready to transfer the water into my system, there is another pump inside the barrel (switch #4 in pic #4). I also shut off my auto top off (also in pic#1) & skimmer pump.
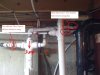
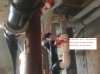
Pic #2 & Pic #3
While still running the main pump, I shut off drain valve 1&2 and opened drain valve 3&4. The water now is going from my system directly into my sewage line. I watch until it gets to a certain level within my sump which marked off by a marker. Once it gets there, I shut off the main pump (switch #2).
Then I turn on my barrel pump (switch #4) and also open the "New saltwater valve" (Pic #2). Drain all the water from the barrel to my sump until it gets to the normal level and shut off the barrel pump, close new saltwater valve. Thats it.
Of course once complete, I also reversed my step to ensure all the valves are in the right positions. Once the water is made, it typically takes me 10-15mins--majority of the time is just watching to make sure you dont overfill/overdrain. I do a ~50 gal changes every 2-3 weeks for my ~350g total system.
Hope that helps and let me know if you have questions
Pic #1
First, RO water is automatically delivered in my 55gal top barrel. When its time for water change, I mix saltwater in the bottom barrel. To mix and heat the newly made saltwater, there is a rio1700 and a heater controlled by a switch (switch #1 in Pic #4). When I'm ready to transfer the water into my system, there is another pump inside the barrel (switch #4 in pic #4). I also shut off my auto top off (also in pic#1) & skimmer pump.
Pic #2 & Pic #3
While still running the main pump, I shut off drain valve 1&2 and opened drain valve 3&4. The water now is going from my system directly into my sewage line. I watch until it gets to a certain level within my sump which marked off by a marker. Once it gets there, I shut off the main pump (switch #2).
Then I turn on my barrel pump (switch #4) and also open the "New saltwater valve" (Pic #2). Drain all the water from the barrel to my sump until it gets to the normal level and shut off the barrel pump, close new saltwater valve. Thats it.
Of course once complete, I also reversed my step to ensure all the valves are in the right positions. Once the water is made, it typically takes me 10-15mins--majority of the time is just watching to make sure you dont overfill/overdrain. I do a ~50 gal changes every 2-3 weeks for my ~350g total system.
Hope that helps and let me know if you have questions
Attachments
OP
OP
These ideas are coming through as brilliant for the work done. It seems to be the toughest part is setting up my plumbing for a water change. I don't want drain any water from the main display that would expose any corals to air. I'll find a combined 10 to 15% of my water volume to drain to the sewerage. Once my water change plumbing is done then I can set up the 120g tank.
The water level in my display never go past the grate line of my overflow since all the water im draining is from my sump. Only the water level in sump goes down to a predetermined level. And the new water coming in will mix with the remaining sump water before it gets to the display.
My setup is also works for me because if a power outage were to occur, the sump still have some room for some water to gets drain into it.
My setup is also works for me because if a power outage were to occur, the sump still have some room for some water to gets drain into it.

Similar threads
- Replies
- 2
- Views
- 316
