So I have been meaning to create a build thread for my current project but I am horrible about taking pictures during the process and even though it’s later in the build process I am reaching the more DIY part so feedback is always appreciated.
Background
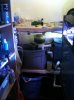
I am upgrading to a 92 corner from a 60 cube. After having a 240 in Seattle I knew I needed something bigger but I don’t quite have the room here that I did there....tiny Boston apartments. My goal was to get to a larger size while still condensing so I wouldn’t take up to much space. I wanted to coordinate this with my move to a new apartment. Long story short I ended up acquiring a corner tank and then finding a great deal on a place that didn’t have any true corners in the living room >_< . So sprang the idea of a closet fish room.
Goal
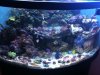
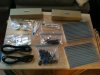
Ok background complete so my goal here was to make a mixed reef attached to a frag tank and then mixed with a refugium (or two) and a chamber for my skimmer and equipment. At this point I am partially complete. As a side goal I will build a DIY LED setup for the frag tank in a few weeks to see how I like it. With the goal of converting the main tank to leds if I like how the frag tank does under them. Will give them about 6 months which are when I need to upgrade my halide bulbs before I make the call.
Equipment
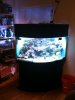
92g corner aquarium with built in overflows
Flow:
2 tunze 6045 power heads
vortech mp40w
Filtration:
150 lbs + of live rock
3-4” live sand across the entire bottom
Lighting:
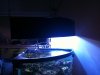
2 250 icecap ballasts powering a 14k Hamilton and a 20k radium under a spider reflector
4 24” T5’s under tek2 reflectors. 2 UVI super actinic, 1 UVI actinic white, 1 Giesemann AquaBlue +
powered by 2 giesemann ballasts
24” icecap moonlight strip (waiting on delivery)
This drains to a 20g refugium which contains:
30 lbs+ live rock
1” mineral mud across the entire bottom
Clump of chaeto
3 mangroves
Clip on CF bulb and reflector from HD
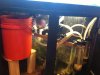
This drains to another 20g Rubbermaid which contains:
300w heater
ASM G4+ Skimmer(leftover from my old tank probably to powerful but I really like it)
Korallin calcium reactor drip location(Still need to set this up)
This drains into the final 20g sump which holds more live rock, chaeto, and mangroves. Also attached down here is a 5g bucket used as a RDSB and 2 media reactors contains phosban, purigen, sometimes carbon or other media.
Anther clamp on HD light
external Eheim 1262 return pump
Other:
Reefkeeper light runs the lights, heater, and fans
35g water reservoir …currently holds another 80+ lbs of live rock of which some will go into the frag tank and the rest eventually sold
20g salt water bucket for easier water changes…currently running as my water reservoir
Tunze Ato
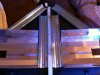
Pulley system to raise the canopy
*expansions*
I will be adding a 40 breeder on the top shelf hopefully over the next few weeks which will pull from the skimmer chamber and drain in the first refugium.
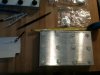
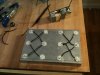
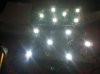
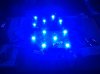
DIY light setup for the frag tank
Problems:
My canopy has no opening for fish maintenance. Didn’t notice this when I bought it. Also it sits very low only about 9” above the water. I decided on using a pulley system to lift the canopy out of the way when I wanted to work on the fish tank. I am one of those people that have their hands in the tank all the time. Next I realized that the halides were way to close to the water and I would heat up the tank fast. So I raised the canopy about 2” to let more air flow through. Still was getting to hot and my fans weren’t cutting it. So as I walked by a garage sale I saw one of those smaller vornado fans the 503 model. Well it’s not quiet on full blast but wow almost no heat issues now. Although my top off went way up hence the ATO purchase.
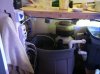
Plumbing well I am a fan of chaotic plumbing (anyone who saw my cube with secondary refugium in the closet around the corner understands). But had a few issues with gravity and of course small leaks. Most of it is now resolved although I have learned an important thing about shut off valves and water pressure.
Will post some pictures they are not great because they are off my iphone. Still looking for my camera battery charger. Also they are not clean pics I haven’t had the time to make everything pretty yet so bare with me on that.
Background
I am upgrading to a 92 corner from a 60 cube. After having a 240 in Seattle I knew I needed something bigger but I don’t quite have the room here that I did there....tiny Boston apartments. My goal was to get to a larger size while still condensing so I wouldn’t take up to much space. I wanted to coordinate this with my move to a new apartment. Long story short I ended up acquiring a corner tank and then finding a great deal on a place that didn’t have any true corners in the living room >_< . So sprang the idea of a closet fish room.
Goal
Ok background complete so my goal here was to make a mixed reef attached to a frag tank and then mixed with a refugium (or two) and a chamber for my skimmer and equipment. At this point I am partially complete. As a side goal I will build a DIY LED setup for the frag tank in a few weeks to see how I like it. With the goal of converting the main tank to leds if I like how the frag tank does under them. Will give them about 6 months which are when I need to upgrade my halide bulbs before I make the call.
Equipment
92g corner aquarium with built in overflows
Flow:
2 tunze 6045 power heads
vortech mp40w
Filtration:
150 lbs + of live rock
3-4” live sand across the entire bottom
Lighting:
2 250 icecap ballasts powering a 14k Hamilton and a 20k radium under a spider reflector
4 24” T5’s under tek2 reflectors. 2 UVI super actinic, 1 UVI actinic white, 1 Giesemann AquaBlue +
powered by 2 giesemann ballasts
24” icecap moonlight strip (waiting on delivery)
This drains to a 20g refugium which contains:
30 lbs+ live rock
1” mineral mud across the entire bottom
Clump of chaeto
3 mangroves
Clip on CF bulb and reflector from HD
This drains to another 20g Rubbermaid which contains:
300w heater
ASM G4+ Skimmer(leftover from my old tank probably to powerful but I really like it)
Korallin calcium reactor drip location(Still need to set this up)
This drains into the final 20g sump which holds more live rock, chaeto, and mangroves. Also attached down here is a 5g bucket used as a RDSB and 2 media reactors contains phosban, purigen, sometimes carbon or other media.
Anther clamp on HD light
external Eheim 1262 return pump
Other:
Reefkeeper light runs the lights, heater, and fans
35g water reservoir …currently holds another 80+ lbs of live rock of which some will go into the frag tank and the rest eventually sold
20g salt water bucket for easier water changes…currently running as my water reservoir
Tunze Ato
Pulley system to raise the canopy
*expansions*
I will be adding a 40 breeder on the top shelf hopefully over the next few weeks which will pull from the skimmer chamber and drain in the first refugium.
DIY light setup for the frag tank
Problems:
My canopy has no opening for fish maintenance. Didn’t notice this when I bought it. Also it sits very low only about 9” above the water. I decided on using a pulley system to lift the canopy out of the way when I wanted to work on the fish tank. I am one of those people that have their hands in the tank all the time. Next I realized that the halides were way to close to the water and I would heat up the tank fast. So I raised the canopy about 2” to let more air flow through. Still was getting to hot and my fans weren’t cutting it. So as I walked by a garage sale I saw one of those smaller vornado fans the 503 model. Well it’s not quiet on full blast but wow almost no heat issues now. Although my top off went way up hence the ATO purchase.
Plumbing well I am a fan of chaotic plumbing (anyone who saw my cube with secondary refugium in the closet around the corner understands). But had a few issues with gravity and of course small leaks. Most of it is now resolved although I have learned an important thing about shut off valves and water pressure.
Will post some pictures they are not great because they are off my iphone. Still looking for my camera battery charger. Also they are not clean pics I haven’t had the time to make everything pretty yet so bare with me on that.