92g corner build + closet fish room

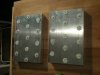
ok so my led project is on hold for a few days as i wait a backup part and since the july 4th sale was so good i went ahead and ordered another batch of 24 leds from rapidled.com to fully light my 40g breeder.

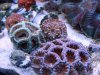
Once this is all setup i will be fragging some of my corals and putting duplicates into the frag tank so i can see the color difference over the next couple of months.

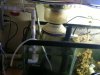
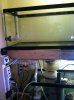
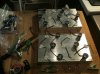
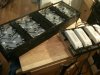
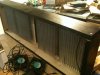
Also decided to give the silicone one extra day to cure before i moved the tank and starting drilling holes into it.

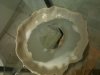
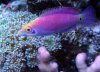
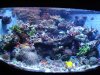
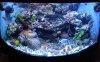
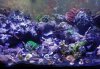
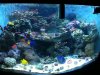
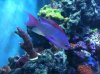
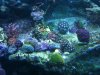
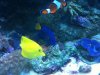
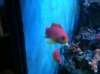
Uploaded a couple pictures of the tank. All the hair algea, brown algea, and dinos gone...still have a bit of cyno though. Still using the iphone, i will get my better camera up running soon.
 

Attachments

  • IMG_0310.jpg
    IMG_0310.jpg
    96.6 KB · Views: 377
  • IMG_0290.jpg
    IMG_0290.jpg
    93.9 KB · Views: 374
  • IMG_0287.jpg
    IMG_0287.jpg
    96.2 KB · Views: 387
  • IMG_0305.jpg
    IMG_0305.jpg
    93.3 KB · Views: 375
  • IMG_0253.jpg
    IMG_0253.jpg
    84.4 KB · Views: 368
Well I survived drilling both tanks and found it suprisingly easy if a bit unnerving. Taking out all the old plumbing and installing the new tanks was a bit of a pain but everything came out pretty well. After talking with some friends i realized my top shelf of my stand was a bit weak so i took it off and reinforced it. So all in all i feel better about my plumbing and nothing linked to the tank is being held by a rubbermaid tub:)


Once again my order from rapidled.com came super fast so i was able to finish all the soldering of the new Leds. Thankfully i am getting better at the soldering thing and its taking much less time and fewer cussing fits. I have added an extra led per heatsink and changed the pattern that i use so we will see if their is much of a difference once i can light this all.

Next i should be able to mount the heatsinks to a fixture and wire in the fans. Then i just have to wait tell i get my reefkeeper module and this thing will be ready to go.
 

Attachments

  • IMG_0315.jpg
    IMG_0315.jpg
    96.4 KB · Views: 365
  • IMG_0330.jpg
    IMG_0330.jpg
    85.5 KB · Views: 363
  • IMG_0328.jpg
    IMG_0328.jpg
    92.1 KB · Views: 368
  • IMG_0332.jpg
    IMG_0332.jpg
    86.5 KB · Views: 372
  • IMG_0333.jpg
    IMG_0333.jpg
    90.6 KB · Views: 359
Cool lights! :)

I wouldn't sleep if that rubbermaid tote was in my house.

think i will add some support braces just in case

Personally, I wouldn't waste my time trying to beef up a $3 tote, and would replace it with a container designed to hold liquid.
 
Cool lights! :)

I wouldn't sleep if that rubbermaid tote was in my house.


Personally, I wouldn't waste my time trying to beef up a $3 tote, and would replace it with a container designed to hold liquid.

Yeah the more I thought about it the less i liked the idea. So now i have a 40g breeder that my equipment goes into. The only rubbermaids still in use is a heavy duty 25g that holds water for my top off and another 15g one that i use for water changes. Neither one has any holes drilled into so i think they should be ok...fingers crossed. At least if something were to happen it wouldnt crash my system though.
 
Well i finally got everything positioned into the fixture. Like most of my ahead planning things didnt go as planned so i had to change how i planned to hold the heatsinks in place. I was going to place screws into holes that i had drilled through the heatsinks and tighten them with a washer and nut. But when everything was in place it was really accessible to do it this way. So I used some pieces of wood to rest the heatsinks on and brace them from behind. It actually worked out well and gave me some ideas how to make it look much nicer next time. Or later down the road if i decide i want it to look nicer, but i keep reminding myself this is a trial fixture.

Having said that when i can find some good optics for the XP-G i may add some changes so i dont block any angles of light and make the overall fixture more....presentable.

Everything is connected and worked last time i tested it. So as long as i dont bump something tomorrow when i add the fans and hopefully hook up the ALC module i will have a fully operational Led fixture(as i reread this i keep thinking of a similiar line from return of the jedi.) ...maybe i am just tired and want this project to be done :)
 

Attachments

  • IMG_0335.jpg
    IMG_0335.jpg
    90.7 KB · Views: 352
  • IMG_0339.jpg
    IMG_0339.jpg
    92.4 KB · Views: 361
  • IMG_0341.jpg
    IMG_0341.jpg
    93.3 KB · Views: 360
  • IMG_0340.jpg
    IMG_0340.jpg
    93.8 KB · Views: 378
Wanted to update with some pictures of how the 2 tanks looks now and a few new additions.

The Led lights have been amazing at growing sps corals. My frags grow much faster under them than in my display tank. They keep the color fairly well too although i still want to play with it a bit more.

The extra water volume has really helped keep everything in check and now with the additions of ecoback i have little algae and still feed pretty heavy.
 

Attachments

  • mystery.jpg
    mystery.jpg
    57.2 KB · Views: 334
  • FTS-2.jpg
    FTS-2.jpg
    84.8 KB · Views: 328
  • acans.jpg
    acans.jpg
    75.8 KB · Views: 334
  • FTS.jpg
    FTS.jpg
    68.9 KB · Views: 333
  • frag-FTS2.jpg
    frag-FTS2.jpg
    77.3 KB · Views: 333
So just got some updated readings from the BRS Light meter
So my main tank with the MH(250W) and T5 supplement has the following readings
Tank is 24" deep
Top: 420
Middle: 220
Bottom: 175
The LED tank is 16" deep(lens only on the blues not on the whites)
At full power/ at my dimmed settings
Top: 450/ 350
Middle: 350/250
Bottom: 250/180

Very impressed with the LED's going to convert a nano next to LED's and then if everything is going good i will probably attempt to convert the 92 to all LED's
 
Back
Top