Glass frag tank Build

Liam

letting it grow
Here is my first attempt at building a glass tank.
The tank will be a frag tank which will eventually become part of a larger system once i have moved house.
Before i start,thanks to Dave mcreeferson for his help with how to go about this,Steve Mcnally for the place to get the glass and Delta for allowing to go and check out how his new "aquariums for you" tank was put together.

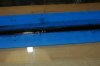
the tank is 36x24x12 rimless and has a starfire front pane.
I used 3/8 glass for the tank,i ordered the glass from contract glass in Wilmington and i have to say they did a fantastic job.
I had all the edges polished and bevelled.

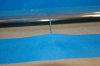
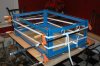
i drilled the tank myself,then taped off all the seams.The seams are taped to leave a 1/8" bead of silicon around the inside.
The panes need to be spaced from each other to allow the silicon to penetrate fully.
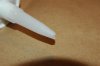
To space the panes i inserted 16 gauge finish nails,the nails are the type that are used in a pneumatic nailer.This helps because these nails have a uniform rectangular profile of around 0.040".
The white tape you can see is actually elastic,i used this to intitially hold the sides in place under slight tension while i inserted the spacers

Here is the tank taped and clamped ready for silicon
 

Attachments

  • DSC_2382 (Medium).JPG
    DSC_2382 (Medium).JPG
    74.2 KB · Views: 3,539
Last edited:
liam

would you ever take a shot at making the main tank itself

as you probably seen mine will be 60x30x30 thinking of doing it myself
 
would you ever take a shot at making the main tank itself

as you probably seen mine will be 60x30x30 thinking of doing it myself

yep, that comes once i have moved.
i am planning on a 72x36x24,this is a practice run and providing it does'nt leak i will build the big one.
It looks intimidating put once you see how it all works there is nothing to it.
(famous last words:D)
 
here is a pic of how i inserted the spacers.
They are inserted from the outside,just inside the bevel.They will be removed and the small holes filled from the outside once the tank has cured
 

Attachments

  • DSC_2383 (Medium).JPG
    DSC_2383 (Medium).JPG
    33.8 KB · Views: 1,364
here is a pic of a spacer at the base of the tank
 

Attachments

  • DSC_2385 (Medium).JPG
    DSC_2385 (Medium).JPG
    42.8 KB · Views: 1,375
one last question

do you have any threads or websites taht you know that explain teh procedures

I am on rc know checking

thanks again
 
do you have any threads or websites taht you know that explain teh procedures

I am on rc know checking

thanks again

Dave Mcreeferson.com:D

I really could not find too much info.I could find tips on glass sizing and that was about it.
For the most part i just asked Dave who has already built a large tank and had already done the homework.
Thanks Dave:)
 
looks great Liam and cudos for you building your own custom :)

As you may already know I now work with Dave and we talk everyday about something hobby related. I must admit I would consider making my own super tank knowing Dave could give me insight :)
 
looks great Liam and cudos for you building your own custom :)

As you may already know I now work with Dave and we talk everyday about something hobby related. I must admit I would consider making my own super tank knowing Dave could give me insight :)

thanks Kevin
 
Great job. I'm planning on building a glass tank a year or two from now if I still have the desire for a big tank. Sounds like the club has some good resources for info.:)
 
Looking good Liam, good idea on using the nails as your spacers. :)

Dave Mcreeferson.com:D

I really could not find too much info.I could find tips on glass sizing and that was about it.
For the most part i just asked Dave who has already built a large tank and had already done the homework.
Thanks Dave:)

Forget about it, I am just glad to be able to give something back in exchange for your reef keeping wisdom. :)
 
Looking good Liam, good idea on using the nails as your spacers. :)


Forget about it, I am just glad to be able to give something back in exchange for your reef keeping wisdom. :)
Hey...fahgetaboutit.... Sounds like a mob phrase....BTW, Dave....props on the tank building wisdom....My Dad & Godfather..(no pun) built a tank when I was a kid.....It was the very reason from then on I got interested in tanks...
I was 8 years old!!! By 12 I had three of my own...(I could only have them in the basement) that is why my tank now will no way ever be put in the basement.... Unless I say so......:D

BTW......I didn't know you built your own tank..... That the newest one?
 
I used silicone GE 1200 black, which i warmed up before use to help it flow between the glass joints.Even after warming you have to go slowly and surely to get the silicone all the way through.
I cut the nozzle of the silicone tube to a 90 degree angles to help force the silicone into the joint.
 

Attachments

  • DSC_2389 (Medium).JPG
    DSC_2389 (Medium).JPG
    43.4 KB · Views: 1,281
here is a pic of the bead whilst taped.
As you pump in the silicone you keep a careful eye from the outside to ensure the silicone is making it all the way through.
There should be enough silicone come through to virtually fill the void left from bevelling the glass when smoothed out with your fingertip.
If you work quickly you can go back and pump silicon in again at the points where it did not penetrate fully.
after i was sure i was all the way through for the full seam i cleaned up on the inside of the joint.
For this i used a plastic putty knife that i made a small radius on the corners and ran along the bead,this removed excess silicon and left a nice smooth bead.
You need to pay special attention at the corners to ensure the silicone made it all the way through with no voids(fingers crossed)
 

Attachments

  • DSC_2390 (Medium).JPG
    DSC_2390 (Medium).JPG
    48.2 KB · Views: 1,275
Back
Top