Glass frag tank Build

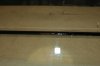
here is a pic with the tape removed.
You need to remove the tape soon after finishing up the silicone work.
If left too long you won't get the tape out.
There should be minimal clean up needed after the tape is removed,anything left will be best removed with a razor once the tank has fully cured.
 

Attachments

  • DSC_2394 (Medium).JPG
    DSC_2394 (Medium).JPG
    50.3 KB · Views: 790
here is pic of the fully silicone tank with the tape removed.
this particular silicone takes 5-7 days to fully cure.
 

Attachments

  • DSC_2395 (Medium).JPG
    DSC_2395 (Medium).JPG
    70.3 KB · Views: 782
Good to see you back into it again Liam. Let me know when you're ready to stock :)
 
Looks great Liam! I wish I thought about using nails like that. I put beads on the ends and then put it all together and then another bead on the inside. I had tons of excess to remove, but it looks like you will have virtually none. I'll have to remember that for my next tank.
 
thanks Andy,Don.
the will let the water test have the final word on if it was work well done:D
 
Liam -

I have a few questions:

1. You mentioned beveling the glass, could you explain the beveling specifics in more detail?

2. The nails you used for spacing, it appears that you only inserted them approximately 1/8-1/4" in from the outside. Is this correct, and how difficult was it to get all the glass to behave when you put it all together?

3. Is the .04" for the nail the size you would use for any size glass, or was that specific to your 3/8" glass? Also, 1/8" bead of silicone - is that specific to your glass thickness and tank size, or a general guideline?

3. Could you take a picture of the tool you used for the inside silicone?

Thanks,
Eric

Hi Eric

1. the bevel on the glass is done at the glass shop.Basically they just polish a very fine bevel on each edge of the glass just to reove the sharp edge.
i will try and get a pic.
2. yes the nails are inserted the smallest amount possible,this creates the smallest void in the silicone possible.
Before i clamped the tank prior to the silicone work i used the elastic and painters tape to hold everything in position whilst i inserted the nails.You do need to be careful but it is pretty easy.Once you are happy with all the nails clamp it up,but with very light force and position the clamps directly over the nails.
3.dave mcreeferson used spacers in his tank build that he left in place. he was using 3/4 inch glass though and i felt a spacer may compromise the seal with only 3/8 glass.His spacers were around 0.050".
i felt the spacing provided by the nails i used would be good for my application. in hindsight i may recommend going with something in the 0.050" just to get the silicone through a bit easier.
again the 1/8 bead was recommended to me by dave,i went with 1/8 each side of the joint,this gave me a 1/4 total filet width.

i will try to get a pic of the tool i made up when i get chance later on hopefully.
HTH
 
Whats the cost of building your own tank? Do you save a lot more?

gavin it would seem to me as the tank size gets larger the saving is larger.

this tank cost me $260 for the glass with all the finishing work done by the glass co. bear in mind one side is starphire.
Most of the cost is in the cutting and polishing of the glass.
this still seems like a lot of cash but look at what a comparable rimless tank would cost off the shelf.


This was a practice run for me,i hope to build my next large display tank which i plan on being 72x36x24.
when you get to a tank of this size the savings are considerable because not only do you have the manufacturing cost but you have delivery to allow for.
with the DIY method you can build the tank right in its final resting point so you don't have to worry about the problems of getting a large tank into your home.

Thanks for the info. It'd be a nice feeling to know that i've built my own tank from scratch. Maybe eventually I'll need to try something small first then work up to a large tank
 
awsome work

1 question

are you inserting the silicone from both side or just from one, if one what side , and should you tape around the crevice on insder and out

thanks
 
Back
Top