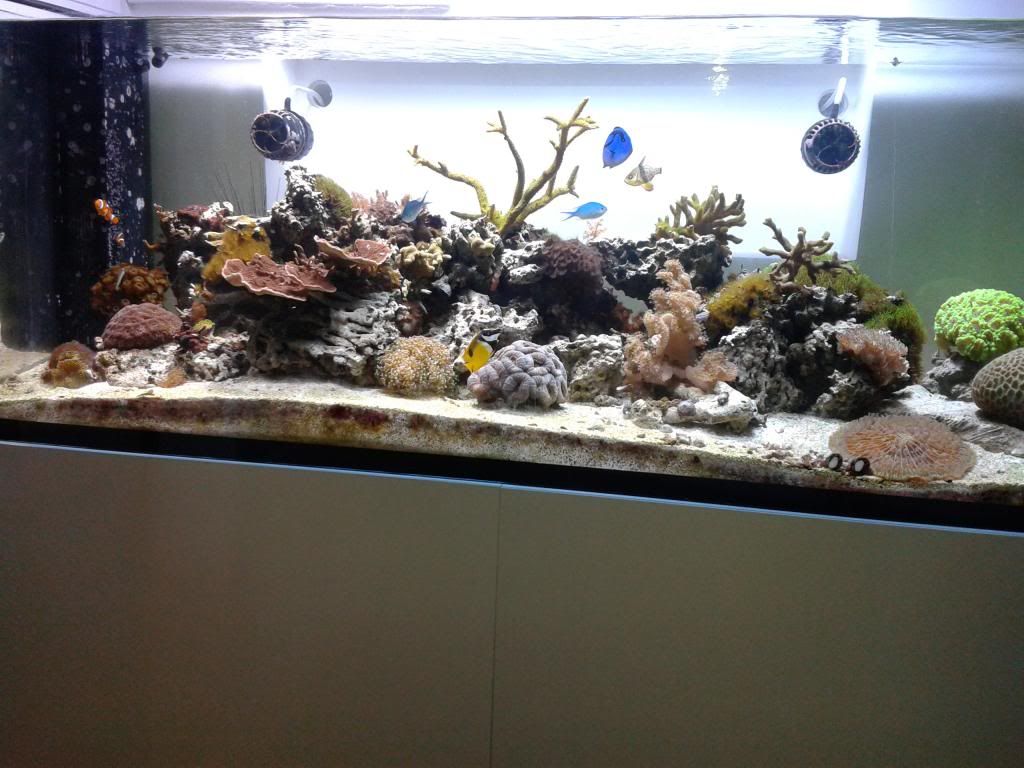
Wife approved upgrade arrives!

Last edited:
Too windy and snowy to work on stuff outside so decided to clean glass then update the build thread. The foxface (recent addition) put the kibotch on that by rocketing towards my arm with it's spines 'o' death (or at least spines of d@#$m that hurt) and almost jumped ::

So I took one cell phone full tank shot.

moreTank009_zps54d5ed32.jpg


My wife actually likes seeing down into the sand bed - I'm not thrilled with it.
I also lost the battle to dip the shingles so they stay that nice new color vs letting them age and turn grey too...But I guess it's good she still likes me as I get old and turn grey(er).
 
Equipment update:
The basket case of wires has been tamed - yes bugs me that I the MP40 controllers are tilted and upsidedown but the cords aren't long enough to do that. Ecotech will lengthen then for you for a nominal fee, but I should have thought of that a year ago. So upsidedown and tilted it is.
Large Image Link (213 kB)
 
Last edited:
An update.
We decided to go back to our reefing roots. So the down with the fancy stuff and back to the cobbled together system.
photo 1.JPG
Ah now that is more like it- stuff on the ground, lots of dangling wires.
Some tank shots:
photo 2.JPG
Lovin' the jumbled, unplanned aqua scape
photo 3.JPG

photo 4.JPG
 
Man, that really rots. Especially when you took all that time to put together the perfect set up. I could not figured how you went from one extreme to the next. I must have missed a post or something. I remember seeing something about a rolling cart, but did not realize it was about this.

Good Luck with all of this. I hope things turn out for the better.
 
yeah good choice of a forum friendly word...

But in a way, this is a good thing - it was too close to the wall to allow cleaning the back glass (or retrieving suicidal snails).

I can improve the plumbing, wire routing and get rid more infernal zoo's / paly's that have been making my wife and I sick - literally, the fumes from them cause flu like symptoms!

She shall rise like the Phoenix! We have the technology, we can rebuild her - stronger, better...
 
An update... got the glue from Elos. Had a very helpful Skype call with Elos (Italy). They walked me through what I need to do, which is basically cut away the bubbled part and farther down, clean and re-apply.
Figured I'd send this picture.
This just seems so wrong!photo.JPG ::
 
Also started plumbing upgrades. Here I've swapped out the ball valves for gates photo.JPG
FAR easier to turn, and more importantly, they have cool red handles.
 
I was so excited to see your post up and expecting an update! I was shocked!...then I scrolled down... you got me good. sucks that you had to take it apart but those are some nice red handles.
 
Wow a Skype call from ELOS, now that's customer service.
I guess its justified seeing the cost of those things.
Gate valves are the way to go!
 
I also posted about the “bubble problem” on Reef Central - Elos has a forum there. Folks did respond to threads complaining about Elos customer service, them being non responsive and things taking forever. The blame was placed generically on “Italy”.

As a consumer, I tend to a nuanced understanding of customer service. I must say specifically that my experience with Italy has been outstanding – heck it was actually fun.

The gentleman I spoke to, who I suspect may be the owner, is obviously passionate about the quality of the products they ship and the enjoyment those products elicit from their customers. He understands that Elos exists because there are folks that share this same passion – and also that when it comes down to it, this is a hobby - it is supposed to be fun. Even if that includes dealing with something, that a previous poster so eloquently put, “rots”.

I post this because the internets are alas not a very nuance friendly place - they are simply a series of tubes.
 
Starting some more upgrades. Today working on the lighting. I have a very pleasing plan. Most of what I did is pretty visually uninteresting (unless holes in metal are your thing) so did not document. These pictures at least have the "dang that is an expensive piece of metal to be modifying" factor.
This is the back of the light bracket. I always hated that I couldn't cover the screw holes because of the back of the bracket running into the cord. Figured since I've already cut the silicon of a tank that cost thousands, I can modify a piddly few hundred dollar aluminum bracket.
photo 2.JPG
You can't read the letters on the flag but it says "Italian Style" - now it has that I think.
photo 1.JPG

I hoped to post the light setup installed but alas ran out of steam / daylight.
Hopefully someone will respond to my post about needing some temporary lights - now you can see why :)
Maybe next week.
 
Last edited:
Slight bit of progress this evening. Thanks to dz6t I could disassemble the lights and route wires.
Lights will mount on the arm attached to the wall. Also got the MP40 wires routed and their associated tubes capped.
Also added a switch outlet so now I can switch off the skimmer when feeding, and the return pump for water changes independently. Alas I could not find a "the clapper" that be cool - "Feed on" clap clap, "Feed off" clap clap ...etc
photo 2.JPG
photo 1.JPG
 
Some more updates.
Got the lights up. Very happy with the projector mount.
photo 1.JPG
I'm not 100% pleased with the way the cords from the halides are visible - but I've gotten a bit of design block - suggestions?
photo.JPG

Also, added a surround for behind the stand - this will prevent seeing the cords from the outlets etc behind the tank. Very happy with how that is going to work out
photo 2.JPG
photo.JPG
You may ask why is it inset like that? Well...the wall is not in the same vertical plane as the stand. One could blame the carpenter of said wall (yours truly) but I have an excuse... I actually made the wall that way because level, plumb and square has a tendency to not match existing stuff in this house. So I took a page from the Taj Mahal's design book and made the wall look plumb to the eye. Thus to preserve the illusion, I can't have a level and square object butting up to the wall.
 

Attachments

  • photo.JPG
    photo.JPG
    34.9 KB · Views: 477
Back
Top