willrays 120 build

willray

Division Champs
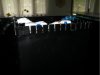
A few specs....120 glasscages tank with low iron glass on three sides.:D

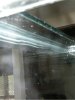
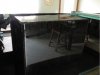
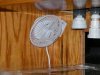
The first thing I do is silicon around the underside of the top rim this prevents salt creep...works very well I have done to 3 other tanks in the past.

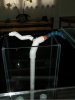
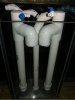
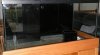
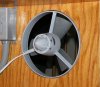
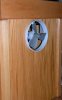
Return with locline outlets.

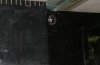
The 1/2" locline is held in place via a snap groove.Way easier to seperate those suckers apart especially when they are in place.
 

Attachments

  • silicon.JPG
    silicon.JPG
    88.3 KB · Views: 1,203
  • return.JPG
    return.JPG
    87.9 KB · Views: 1,216
  • locline groove.JPG
    locline groove.JPG
    55.7 KB · Views: 1,191
  • locline connected.JPG
    locline connected.JPG
    55.6 KB · Views: 1,209
Overflow plumbing with snail gaurds and john guest fittings for air draw.
The left one is going to feed the skimmer and of course the right one goes to the sump/fuge.

The acrylic overflow that came with it had groves that were only 1/8 wide.That wasn't enough as the water almost edged over the top.That was with a pump smaller that I want to use too soo I made them 1/4 wide the hard way....with a file.


The cover I made for the overflow.
 

Attachments

  • overflow plumbing.JPG
    overflow plumbing.JPG
    88.5 KB · Views: 1,200
  • overflow.JPG
    overflow.JPG
    75.5 KB · Views: 1,190
  • overflow cover.JPG
    overflow cover.JPG
    91.6 KB · Views: 1,186
Will, that must have been a PIA to open up all thoes sections of the acrylic overflow with a file. Looks good.
Did you have glass cages ship to you or did you pick it up in Boston?
What do you plan on stocking it with?
 
Hey Will

I am going to have to come by and see the new setup onces its done. I am setting up a 92 corner now, so I will have to watch this thread for some Ideas.

I like the silicone tip, I will have to check out my tank and do that before I set it up.

I am having CS build me an overflow, since my tank is was not Reef Ready and I don't think I could build one with a file :D

John
 
Looks good Will. I'll follow this thread as well since I'm setting up a 120. While my tank is still empty I'll apply a bead of silicone as well.

What brand of silicone did you use? I'm using GE1 clear for doors and windows no Bio Seal. Used on my 90 in use for 4 years to re-seal the entire tank, no issues. Here's a tip when smoothing out silicone, spit on the finger, lots of it and smooth the silicone, painters tape for clean edges and trim with a blade.
 
Nice job, I would have went nuts sitting there with a file.

Looks good Will. I'll follow this thread as well since I'm setting up a 120. While my tank is still empty I'll apply a bead of silicone as well.

What brand of silicone did you use? I'm using GE1 clear for doors and windows no Bio Seal. Used on my 90 in use for 4 years to re-seal the entire tank, no issues. Here's a tip when smoothing out silicone, spit on the finger, lots of it and smooth the silicone, painters tape for clean edges and trim with a blade.

A cup filled with water or a few soaked paper towels will serve they same perpose of keeping your finger wet.
 
I got the tank from -B- and will be a mixed reef.The filing wasn't to bad only took about 15 min remember the slots where already there.This tank is huge and heavy so I need to work with where it is.Re:the silicon I use regular aquarium sealer and marine grade from walmart same size tubes.I know it's not the smoothest job but it was difficult to maneuver/twisting myself for smoothing it and it cannot be seen once full.
 
more pics

The hydor korilia is held in place with a s.s. pin with a twist/bend so that it will not hit the prop shaft.If you look close in the 2nd picture you can see the pin.
 

Attachments

  • hidden korilia.JPG
    hidden korilia.JPG
    82.4 KB · Views: 1,143
  • hydor korilia.JPG
    hydor korilia.JPG
    47.2 KB · Views: 1,154
under the stand

Seeing as I am not a time frame...Sort of:eek: I am going to try and finish even the little details that will matter mostly to me.Example: framing the cutout.

Also put a bead of silicon around the inside of the stand just in case there is an accident spill/leak of some sort, guesstamating it will hold about 4 gallons before it will spill over and onto the floor.
 

Attachments

  • cut out.JPG
    cut out.JPG
    64.3 KB · Views: 1,134
  • silicon bead (3).JPG
    silicon bead (3).JPG
    63.5 KB · Views: 1,118
Will

I was thinking about using a pond liner in the bottom of my new stand. I have some I bought for the inside of my Orchid case, which has a pool of water in the bottom of it at all times. I figure if I add a small inner frame I can line it and then have it be water tight and hold several gallons of water.

The other thing I just did was had an alarm installed, that is also monitored, and I had 2 water sensors hooked directly into it. One for my water heater and one for my fish tank. I should get notified immediately when I have a water leak.

John

Hopfully I won't need the containment area as I want to have redundent failsafes because my top off container is 55 gal. coming from the basement.The alarm and sensors are a good idea.

Awesome build :)

looks great so far :)

thanks! lots more to come.
 
stand fans

Sump cooling fan.These small fans can be purchased everywhere inexpensive,effective,and near silent.

The exhaust fan well...that was a bit of a search.I got it a BJ's cost $20 and was perfect for several reasons.Size,sound,mounting ability.Most fans in the 9-10" range are to noisy from poor design or being high velocity.The fan is rubber and completely safe.I did remove the base(screws) and feet(saw).The outer band of the fan is tapered so I used my rotozip to cut the hole with a tapper to it to match the fan and presto!
 

Attachments

  • cooling fan.JPG
    cooling fan.JPG
    93.6 KB · Views: 1,079
  • exhaust fan.jpg
    exhaust fan.jpg
    47.2 KB · Views: 1,070
  • exhaust fan..outside.JPG
    exhaust fan..outside.JPG
    82.2 KB · Views: 1,074
very good idea on the exhaust fan out of the sump... i may do that myself. On hot days i open the doors on my sump up so the hot air can escape. I do have a small fan clipped over the sump in the stand, but it doesn't do much if the air has no place to go.
 
Another great advantage of the exhaust fans is that it pulls that nasty corrosive salt air away from all the electrical stuff.
 
canopy pics

I try to hide as much as possible.Hinge,brackets,screws.....

canopy.JPG
I like how the grain follows around the side to the front.

canopy cooling fans end.JPG
2 x 120 mm 73 cfm 18db fans will go here.I have these holes tapered so it funnels the air effortlessly and quietly out.I am still undecided on as too put oak grill on the intake end or router some slots...I'll probably go with slots.That way I can do a pattern that will please me and be efficient.
 
Last edited:
more canopy pics

canopy front access panel open.JPG
It wasn't easy finding hindges that are hidden and swing open enough but I did.These babies open 280 degrees alowing me quick and easy access.

I can only reach in the tank so far soo this was my solution to that.This panel swings on a pivot.canopy 2nd panel open.JPG
 
Back
Top