You are using an out of date browser. It may not display this or other websites correctly.
You should upgrade or use an alternative browser.
You should upgrade or use an alternative browser.
willrays 120 build
- Thread starter willray
- Start date
OP
OP
more on my canopy
O.K. Heres more.
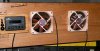
These Noctua NFS-12B fans are incredible.100 cfm @ 18 db or 75 cfm @10 db or 50 cfm @ 6 db with a 6 yr warranty.For once I think the manufacturers specs are accurate.
Thanks Andy!looks good Bill
....looks good....i love when people take their time on the set-up....it goes a long way.....you wont have to rip half the stand apart to re-place or re-do something that you hacked in the first place....keep the pics comming...
O.K. Heres more.
These Noctua NFS-12B fans are incredible.100 cfm @ 18 db or 75 cfm @10 db or 50 cfm @ 6 db with a 6 yr warranty.For once I think the manufacturers specs are accurate.
Attachments
OP
OP
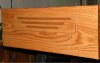
canopy vent/louver
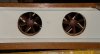
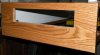
I was going to use a oak floor register but really didn't care for the look.But the main reason for not going with a register was that the louver vents go in 2 directions and I didn't want the light out of the louvers to blare the eyes.
It is much better to pull/draw the air over over the lamps as opposed to blowing.
So this was my solution.
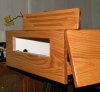
A rectangle cut out with a slight slant to it and a matching insert that way nothing is required to hold it in place just press in and or pull out.It can only be inserted so far and can not fall inward.
I routed the louvers at an angle.The vents go up so there will be no light glaring into the peoples eyes.
Bonus will be the ease of accessing the end for whatever reason...to look at bulbs...easier feeding....
Some day I'll have to figure out how to post the text under the pics to make it easier.Till then sorrow!
As always thanks for looking.
I was going to use a oak floor register but really didn't care for the look.But the main reason for not going with a register was that the louver vents go in 2 directions and I didn't want the light out of the louvers to blare the eyes.
It is much better to pull/draw the air over over the lamps as opposed to blowing.
So this was my solution.
A rectangle cut out with a slight slant to it and a matching insert that way nothing is required to hold it in place just press in and or pull out.It can only be inserted so far and can not fall inward.
I routed the louvers at an angle.The vents go up so there will be no light glaring into the peoples eyes.
Bonus will be the ease of accessing the end for whatever reason...to look at bulbs...easier feeding....
Some day I'll have to figure out how to post the text under the pics to make it easier.Till then sorrow!
As always thanks for looking.
Attachments
Last edited:
OP
OP
Canopy lining and B11's
I wasn't happy with the flat white.Way less reflection than I expected.I did a reflection test at night with a flashlight.What a hugh difference.So I bought a windshield visor and striped it up then secured it with stainless steel staples.I'm not to concerned about the heat because these things were made for extremes, foil on one side foam on the other.
And for an inexpensive piece of mind 3 x B11's back up air pumps.2 for the display and 1 for the fuge.
Attachments
Good use of a the windshield reflector to get more lighting. Next time I'm in the auto parts dept I'm going to inspect the shield to see how it looks as I imagine it secured in the canopy. Good chance I'll like the effect. I'll see how well it secures with hot melt glue tho the stainless steel staples would make for quick work.
OP
OP
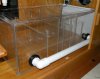
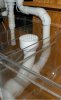
Re sump plumbing in post 39
I have question!Water level stays abouts 1/2 higher on the fuge side.The flow thur the compartments isn't enough for my comfort/security.What I've got are 2x1 1/2" bulkheads.Problem is the hole is already 1 1/2 which makes it tough to hole saw without adding another pc of acrylic for the pilot hole.Here's the question.Should I cut an 2 over-sized pieces of acrylic and use weld-on so there would be have 2 layers of acrylic?
I have question!Water level stays abouts 1/2 higher on the fuge side.The flow thur the compartments isn't enough for my comfort/security.What I've got are 2x1 1/2" bulkheads.Problem is the hole is already 1 1/2 which makes it tough to hole saw without adding another pc of acrylic for the pilot hole.Here's the question.Should I cut an 2 over-sized pieces of acrylic and use weld-on so there would be have 2 layers of acrylic?
Last edited:
I think you are fine.
The water level is rising until there is enough head pressure to get the water to the other side.
1.5 pvc should be plenty enough for the flow from one side to the other.
For piece of mind you could make a 1x1 or 1.5 notch in the two tallest dividers. That way if the water level ever gets too high in the fuge section it would be able to skip right over and into the return section.
Should make sense (I think).
By the way - Your build is going great. Keep up the good work and planning.
OP
OP
There was a couple of reasons for the swap.One being the flow thru the other was I couldn't stop the right diy bulkhead from leaking.I have a space retriction(see pic)just made it by 1/4".I had to shorten couplings and elbows to do it.Jennifer I went from a 1.25 to 1.5.Thanks for the good words.
Attachments
Last edited:
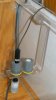
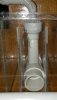
i like this set up its amazing what u can do with a little heat and a bendAcrylic with water-resistant electrical connectors to hold the probes and the smaller hole/slot near the bottom bend is for the temp probe.
I cant believe the work you are doing, top notch. I pay attention to detail, but you are at another level. Everything looks great. I wish I was out your way, I would find some excuse to come by, and see your set up. Keep up the good work, and love the pictures.
Derek
Derek
OP
OP
I appreciate it.Come buy anytime.No excuse needed.I cant believe the work you are doing, top notch. I pay attention to detail, but you are at another level. Everything looks great. I wish I was out your way, I would find some excuse to come by, and see your set up. Keep up the good work, and love the pictures.
Derek
WOW this build is amazing. you dont skimp on anything. looks great! like love how you mounted the RKL and how you hit the korila. im going to steel that idea for my next tank.
Thank you! I decided to make another mod rock like the
other.
i like this set up its amazing what u can do with a little heat and a bend
Most anything can be persuaded.
Last edited:
OP
OP
OP
OP
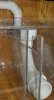
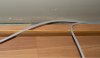
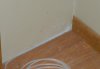
top off hoses
I wanted to add top off from the basement.This room being an addition onto the house posed a problem it just sits on a foundation.My solution was to run along the baseboards(rotozip the drywall) until I reached the basement wall then the hammerdrill thru the 12" of foundation to the 55 gal drum. Phew!
2 hoses,1 for top off the other for a tsunami ATO.
Attachments
Similar threads
- Replies
- 1
- Views
- 262
- Replies
- 13
- Views
- 1K
