You are using an out of date browser. It may not display this or other websites correctly.
You should upgrade or use an alternative browser.
You should upgrade or use an alternative browser.
willrays 120 build
- Thread starter willray
- Start date
OP
OP
you are doing some solid work here for sure.
Thanks Joel
I really like the idea of the john guest valves on the durso's as well. Have you done that in the past, and if so, does it really help adjust the air intake and help you make the overflow near silent?
I haven't done it in the past but got the idea from Jimmy7090...I think.thanks Jimmy!
In a trial run it did work well especially the skimmer feed drain although I may go to the next size up fitting on the sump overflow because I had to drill the hole larger and have it open most of the way.No holes with zip ties anymore for me.


OP
OP
wow sick sea-flow rock....but 2 questions, can you get to the pump easy enough for cleaning etc?, and is there enough space around the mod so it can suck in enough water to put out the full amount of flow?
I can easily take the impeller out for cleaning and there is enough space around the mod for full throttle
 flow.
flow.I didn't make the initial rock work around the pump itself (thanks -B-)I just hid the mod more and added the rocks on the bottom for a extra height.
Looking great Bill!!! I can't wait to see what you do with it...
Some unbelievable work there, are you for hire???
Some unbelievable work there, are you for hire???
OP
OP
Looking great Bill!!! I can't wait to see what you do with it...
Some unbelievable work there, are you for hire???
Thanks B! You already know the answer.

OP
OP
Looking very nice.. i dont know if you wrote this..but what kind of light setup you going for?
I'll probably retro my diy hood...probablyy
http://www.bostonreefers.org/forums/showthread.php?t=54108
Last edited:
OP
OP
electrical
Thanks......Me either.
Looking great cant wait to see this all come together.
Thanks......Me either.
Attachments
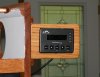
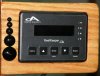
Willray - What do you have the head unit from the reefkeeper going to? I just got mine the other day and am a little disapointed on the lenght of the the cable the head unit has. I was looking at mounting it in my canopy (front, the side is near the couch and don't want my kids messing with it), but I don't know if it will reach to the next piece.
How tall is your canopy?
How tall is your canopy?
OP
OP
Whoa, looks great! Nice and neat It doesn't look like mine that's for sure. Wires everywhere!!
Thanks Rob.That's what I'm trying for...neat and orderly/organized.Of course it is a lot easier with nothing in your way and no time pressure.
Willray - What do you have the head unit from the reefkeeper going to? I just got mine the other day and am a little disapointed on the lenght of the the cable the head unit has. I was looking at mounting it in my canopy (front, the side is near the couch and don't want my kids messing with it), but I don't know if it will reach to the next piece.
How tall is your canopy?
I have it plugged into one of the power strips.You can plug into any piece as there isn't any order to the connections.
Canopy is made of 1 x 10 red oak. Imo this will be a good height to allow for even light distribution and more efficient cooling.
Btw you can get/order a longer bus cable if needed.
OP
OP
Looks like you put a lot of thought and time into this Bill. Looks very good. I'm gonna have to steal some of your ideas when I'm ready to setup up my tank.
Most of my plans/ideas come from the 2 cups of coffee b4 work.
jk...sort of.Thanks Pete.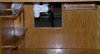
OP
OP
sump
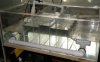
This a good sized sump 36x20x15.Not sure of its original design but I had to mod it for my needs.The tank water enters in the middle with the flow going to both sides, more going to the return side maybe 60 % and 40% to the fuge.The plumbing brings the water from the fuge side to the return side.The middle part where the tank water enters was way to high for my bubble trap(more on that soon) about an 1" from the top so I had to roto- zip it down a few inches hence the hacked look.. Notice the snail/critter gaurd?
This a good sized sump 36x20x15.Not sure of its original design but I had to mod it for my needs.The tank water enters in the middle with the flow going to both sides, more going to the return side maybe 60 % and 40% to the fuge.The plumbing brings the water from the fuge side to the return side.The middle part where the tank water enters was way to high for my bubble trap(more on that soon) about an 1" from the top so I had to roto- zip it down a few inches hence the hacked look.
. Notice the snail/critter gaurd?Attachments
OP
OP
I have a mission and a promise to myself and that is to do atleast one task a day on the setup.
Forgive me.I'm am trying not to drag this on but my time is limited and was concerned that if I didn't start documenting somewhere I eventually would get to the point of being behind/overwhelmed and end up with nothing.
Get on with it already...Trying to use all the kinetic energy as possible.On the fuge side the weir teeth create a nice flow so no pump will be needed but on the return side the teeth crated to many bubbles so I cut the baffle straight across and at a slant down so now the water just flows over.The pic is b4 I cleaned up the beveled edge so it actually flows smoother now than the pic shows.
Forgive me.I'm am trying not to drag this on but my time is limited and was concerned that if I didn't start documenting somewhere I eventually would get to the point of being behind/overwhelmed and end up with nothing.
Get on with it already...
Trying to use all the kinetic energy as possible.On the fuge side the weir teeth create a nice flow so no pump will be needed but on the return side the teeth crated to many bubbles so I cut the baffle straight across and at a slant down so now the water just flows over.The pic is b4 I cleaned up the beveled edge so it actually flows smoother now than the pic shows.Attachments

Similar threads
- Replies
- 1
- Views
- 262
- Replies
- 13
- Views
- 1K
