Corner Tank Build - 54 gallon

I have a pile of broken tanks ready for trash guys...


Sent from my iPad using Tapatalk HD

RutRo............what happened?

Also before I purchased my Reef Octopus I asked one of the Reps on Reef Central and oversizing will actually not benefit, turns to be a disadvantage. Something with the foam head. Just my .2 cents.
 
i ran 2 mag 12 one return and one for the skimmer in my 90 that did not make the water any hotter then it was stayed at 79.9

I am starting to think the old Euro Reef I bought from our auction may have been the heat issue. I have no idea how old the pump on it is... It was rated for 250gallons, so it was a beast.
Do pumps run hotter as they get older?
 
RutRo............what happened?

Also before I purchased my Reef Octopus I asked one of the Reps on Reef Central and oversizing will actually not benefit, turns to be a disadvantage. Something with the foam head. Just my .2 cents.

Had found a strange sized tank for a sump from a member (20x10x16.5"), but it was taller than my 10g so thought it would be good there.. Went to drill it and the entire tank was tempered glass. The next was the 10g I drilled to replace the taller broken tank for sump. It shattered at the return, too much movement and too thin glass.
 
Okay I am at a stand still with this sump... I just purchased a new Reef Octo NW150, the footprint takes up 2/3 of a 10gallon tank! I was going to return it for the 110, but that will cost me more to get less of a skimmer, shipping charges, etc.. I really need to make a decision and figure this sump out. I want a refugium and some area to get some rock out of the display and down in the sump. I can:
A) return the skimmer downgrade and try to use the 10 and HOB refugium I have with an internal Mag5 return pump.
B) Keep the skimmer and try to build or have built an L-shaped custom sump. Internal Mag 5 return, internal refugium on the other side of the L...
C) return the skimmer for credit, run the HOB AquaC remora I have on my current tank. Section the 10 gallon to work this way and use the Hob refugium. So I would have 2 small seperate refugium areas this way but not as effective skimmer.

Or something else? I value your experience and need some advice, please help? Also, if someone can craft an acrylic sump for reasonable price, please help!


Sent from my iPad using Tapatalk HD
 

Attachments

  • ImageUploadedByTapatalk HD1339082902.785292.jpg
    ImageUploadedByTapatalk HD1339082902.785292.jpg
    62.5 KB · Views: 675
How big is the space to the right of the sump in between the frame? You may be able to squeeze a small tank in there for the fuge you want, split the drain so some goes there while the rest goes to the sump. Then have the fuge flow over to the sump.
 
I was going to try that, here's the 5 gallon fail, lol! I could do a 2.5 but that is the same as my HOB ref...
Good thing is I have every kind of equipment under the sun at my fingertips. Be having a clearing sale when this is done.
I am going to try and get something like this I think:
http://www.bulkreefsupply.com/store...s/aqueon-modular-proflex-sump-filtration.html
It will fit just right. I will shell out the money and call it done. The problem is my skimmer footprint is too big for it, lol. So I will have to exchange the skimmer also?!!

Sent from my iPad using Tapatalk HD
 

Attachments

  • ImageUploadedByTapatalk HD1339084654.288803.jpg
    ImageUploadedByTapatalk HD1339084654.288803.jpg
    64.2 KB · Views: 675
  • ImageUploadedByTapatalk HD1339084741.929109.jpg
    ImageUploadedByTapatalk HD1339084741.929109.jpg
    62.5 KB · Views: 662
What if you turn the 5G tank 90 and sit it on top of the ten well half way and build a little stand for it to rest on in the corner and you drill the tank (hoping ) its not tempered and then its output goes to the 10G you could split your overflow from the DT so some water goes down into both the skimmer section and also the fuge. Im also for building a l shape or whatever shape sump from glass to fit in the stand. Its very easy to do and you get the igzact size you want.
 
y not just put 2 baffle in the 10g for buble trap and split the return in two.one going to the display and 1 going to the hob refugium.Assumming the hob fit in the stand and can be hang on the 10g.I have the same problem so i just ran my sump in my closet.
 
Or you can build a stand that all your equipment fits into like I did :) only problem is I'm not much of a carpenter so it's still "not done yet" lol. It works great, and looks decent in pictures. In person it's a little questionable! I have a 20 gal sump, 5 gallon fuge drilled to flow into the sump, display drain is split between skimmer section and fuge tank, and my 2 gallon top off tank sits under my 5 gal fuge. Plus all the plumbing, electrical, and reactors. Nestled neatly under a 54 corner. The stand under hangs the tank by 3" across the front, and 1" across the back/sides. I have some great ideas to build another one, just no artistic ability or programs to draw it up. I will be glad to send you my dimensions and detailed pics if you would like to copy my current stand.
 
Appreciate the ideas. I did try placing the 5g above, but it causes a few issues... The 5g needs to be drilled and plumbed, a cracked tank waiting to happen. And it blocks the return access from the 10 gallon.
I decided to buy a used acrylic sump that fits perfectly in there. It actually will work better than I ever expected. I can even fit my HOB refugium on it to create 2 refugium zones. And now I can easily have my return outside by drilling into the much more stable 1/4" acrylic. I think this is the solution... Thank you Danzig for a great deal!


Sent from my iPad using Tapatalk HD
 

Attachments

  • ImageUploadedByTapatalk HD1339092637.716612.jpg
    ImageUploadedByTapatalk HD1339092637.716612.jpg
    65.3 KB · Views: 661
  • ImageUploadedByTapatalk HD1339092646.347018.jpg
    ImageUploadedByTapatalk HD1339092646.347018.jpg
    62.6 KB · Views: 662
Now some advice on the drains... I am going with a gate valve on the lower main drain that will help keep the level up high on the backup drain. The backup will have a air hole drilled into the cap and is meant to slowly drain water that reaches it. In the case of the main drain failing the air hole will submerge and create full siphon on the backup drain. From the research I have done this should work, right?
The only piece I left out was the 90 pointing down, I wanted to reduce the space consumption...


Sent from my iPad using Tapatalk HD
 

Attachments

  • ImageUploadedByTapatalk HD1339094827.757403.jpg
    ImageUploadedByTapatalk HD1339094827.757403.jpg
    57.4 KB · Views: 657
  • ImageUploadedByTapatalk HD1339094836.786976.jpg
    ImageUploadedByTapatalk HD1339094836.786976.jpg
    56.7 KB · Views: 656
Now some advice on the drains... I am going with a gate valve on the lower main drain that will help keep the level up high on the backup drain. The backup will have a air hole drilled into the cap and is meant to slowly drain water that reaches it. In the case of the main drain failing the air hole will submerge and create full siphon on the backup drain. From the research I have done this should work, right?
The only piece I left out was the 90 pointing down, I wanted to reduce the space consumption...


Sent from my iPad using Tapatalk HD

Skip the vent hole on the back up drain. You are setting up a "herbie" drain. You will use the gate valve to slow the main drain enough that the water level will be most of the way up the overflow but not actually reach the back up.

If you try to do a modified herbie that will normally have a slow trickle going into the back up you are a lot more likely to have a total back up and flood. (for example snails are not likely to crawl into a dry pipe, but they will be very likely to crawl into one with a trickle flowing through it).
 
Okay, thanks for the tips. Here it is background and plumbing done on tank. Need to glue an acrylic overflow that I don't have in place and be ready for testing. I used regular background and cut it very neatly to just reach the seams on the edges. I then used my finger and wiped a little silicone to seal it all around. Worked well, looks clean, and can be removed in a month when I realize I need a bigger tank, lol!


Sent from my iPad using Tapatalk HD
 

Attachments

  • ImageUploadedByTapatalk HD1339125147.081151.jpg
    ImageUploadedByTapatalk HD1339125147.081151.jpg
    58.2 KB · Views: 660
Skip the vent hole on the back up drain. You are setting up a "herbie" drain. You will use the gate valve to slow the main drain enough that the water level will be most of the way up the overflow but not actually reach the back up.

If you try to do a modified herbie that will normally have a slow trickle going into the back up you are a lot more likely to have a total back up and flood. (for example snails are not likely to crawl into a dry pipe, but they will be very likely to crawl into one with a trickle flowing through it).

So let me ask then... Should I just run the pipe straight and maybe cut a few groves in it. If I don't need or want to control the air for flow then I shouldn't need the fittings right?


Sent from my iPad using Tapatalk HD
 
Probably too late but why not make your own acrylic tank/sump? I believe you were at the May meeting & learned how to glue. That way you can make any size and shape.
 
Probably too late but why not make your own acrylic tank/sump? I believe you were at the May meeting & learned how to glue. That way you can make any size and shape.

I am actually using that used one as a base and heavily modding/ adding to it as we speak. I hope it turns out well. I already cleared it up a bunch and made some of the important cuts. So far so good!
 
Okay an update... I ran into some health issues and had to slack a bit on this build... But it is still moving. I have an overflow wall being made ATM by a generously skilled fellow member. I finally worked out my sump plan and have it 75% assembled. I decided on using an internally pump and now I am shopping for the right fit. Looking at the Eheim compact plus series, maybe the 2000??? I will update with some images of the sump and how I plan to move the water through this system. I am also shopping for a controller, thinking Apex Jr is good fit? And will be deciding on my lighting system soon. Either all LED with controllable drivers, or LED and MH. Still not sure...
I will get some images once the sump is ready, the new design will call for a separate refugium, which is next on the list.
 
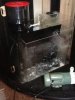
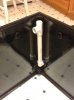
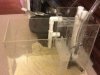
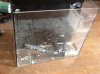
So here is the sump... I tried several designs and finally decided to separate the refugium section.
First I cut the sealed top off the inlet area. It was dirty and there was no way possible to clean it. I thought I could make better use of the space. So I install 1.5" pipe with holes placed strategically on the pipe. I plan to fill this chamber with LR rubble and have my drain enter the pipe which will keep flow on the rocks. The hole in the front is where the water will enter the skimmer section. I will have a 90 pointing down to direct the water. This also should help keep bubbles reduced.
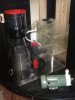
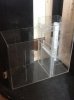
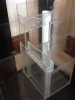
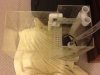
I then removed the tiny refugium section above and turned this into my internal return section. There are 2 baffles, the first keeps the skimmer section constant. The second is about 1" off the bottom to trap bubbles. As a backup I installed egg crate that allows me to place some filter material to stop bubbles and trap anything that got by the skimmer. I am not concerned about changing this because it takes about $.10 worth of filter pad I will pre-cut and have ready. When it gets dirty, out with the old in with the new.
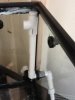
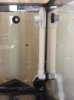
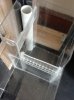
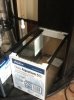
The refugium will go in the space on the right. I am considering building my own out of acrylic. I would like to house some extra LR in it somehow... That is my next design to work out. I plan to have 2 gate vales controlling my herbie drain. One going into that pipe in the sump, the other going into the refugium. I will T the drain just before it enters the gate valve then union into the sump. The other outlet on the T will run 3/4" into my refugium with another gate vale inline. This should allow me to dial in the herbie drain, the refugiums flow, and keep good flow into my sump.

Phase 2 - finish woodwork, paint, and get refugium built or bought?

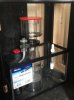
I will be finishing most of the framing and starting to plan the look of the finishing wood. I have most if not all the equipment going under the tank minus a controller. That is next on the list... I am thinking Apex Jr with some add-ons...

Phase 3 - plumbing, leak test, etc..

I ordered some gate valves. I will plumb the system and make sure I design it with enough access and unions that it can be controlled and cleaned once I box in the framework. I plan to get things exciting and start to run some wet tests on the system at that point.

Phase 4 - light design and build

By this point I should have a controller plan and be ready to build or buy a light that will complement a sunrise/ sunset, high noon, lunar function. I want to go as real as possible with my lighting effects this time around.

I hope to begin Phase 4 within 2 weeks. I have had some health issues and that is why my build has slowed down a bit. But in retrospect it allowed me to carefully consider my choices.

Any ideas on how I can house a DSB, decent amount of live rock, and chaeto in the same refugium design. I have about 14" x 10" and can go up to 20" tall, to work with...???

Any suggestions on the light? I was thinking LED with controllable drivers. But havent ruled out MH either... I already have non dimming LED that I can work with and add to it a dimmable driver or two...


Sent from my iPad using Tapatalk HD
 

Attachments

  • ImageUploadedByTapatalk HD1339964003.715985.jpg
    ImageUploadedByTapatalk HD1339964003.715985.jpg
    65.1 KB · Views: 582
  • ImageUploadedByTapatalk HD1339964021.232778.jpg
    ImageUploadedByTapatalk HD1339964021.232778.jpg
    63.4 KB · Views: 580
  • ImageUploadedByTapatalk HD1339964028.526492.jpg
    ImageUploadedByTapatalk HD1339964028.526492.jpg
    70.9 KB · Views: 581
http://www.youtube.com/watch?v=FqIPm_mVbZw&feature=youtube_gdata_player

So I FINALLY got my sump designed, built, and tested. The link above is while it was being tested tonight. It accepts my main drain and back drain into a pipe with holes drilled to spread the water across where there will be LR rubble in that chamber. From there a series of 3 holes, started with one... Had to get the flow right or the chamber overflows! Into the skimmer section which stays at constant 8.5". I have a 2 baffle system with flow chamber at the top. The second baffle is just an inch or so of the bottom. Then the return...
I ordered my acrylic and weld from Tap Plastics also today. It will be 10"x10"x17" - 3/15" thick. I plan to feed it with my return, I think...
I started laying the plumbing. I am waiting for a shipment to arrive with my gate valves. This is needed to regulate the drain. I also have a member crafting the overflow wall and hopefully it will be done pretty soon. I hope in the next few days to do my first wet test! If all goes well, on to the light and finishing woodwork. I think about 2 weeks this will have salt water flowing :)
 
Here are some images... It came along way from when I grabbed it!


Sent from my iPad using Tapatalk HD
 

Attachments

  • ImageUploadedByTapatalk HD1340162070.858865.jpg
    ImageUploadedByTapatalk HD1340162070.858865.jpg
    66 KB · Views: 584
  • ImageUploadedByTapatalk HD1340162082.786099.jpg
    ImageUploadedByTapatalk HD1340162082.786099.jpg
    64.1 KB · Views: 567
Back
Top