-
******* To read about the changes to the marketplace click here
You are using an out of date browser. It may not display this or other websites correctly.
You should upgrade or use an alternative browser.
You should upgrade or use an alternative browser.
New Oceanic Tech tank build
- Thread starter ZenMastr1968
- Start date
johnchapple714
Non-member
Really nice tank and stand. Should look great once its up and running
OP
OP
ZenMastr1968
Non-member
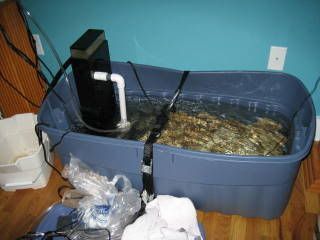
In the 50 gal tub (with the rock) was the Rio 1400, OR 2700, and the Eheim 1262 all running in the water at the same time. I had my titanium heater set for 80 and it wasn't coming on anymore so I dropped a digital thermometer probe in and it was reading 89+... I took the 1262 out and the temperature dropped. I currently have the OR 2700 out while I was trying some modifications on the Urchin skimmer, so the only pump in there now is the Rio 1400. I'm only planning on using the OR and the Eheim in the finished product, but figured that more flow while the rock was cycling wouldn't hurt. Today with just the Rio it's measuring 79.1, but we have the air on and the room is at about 74. I'm almost done tinkering with the skimmer so I'll try putting the 1262 and OR back in (without the Rio) to see what the temp shoots to.
johnchapple714 and phatbob - thanks.... I'm really looking forward to getting it up and running. I keep finding new and interesting coral that I want to add to my collection but have to keep reminding myself I have no room and have to finish the new tank first!
johnchapple714 and phatbob - thanks.... I'm really looking forward to getting it up and running. I keep finding new and interesting coral that I want to add to my collection but have to keep reminding myself I have no room and have to finish the new tank first!
OP
OP
ZenMastr1968
Non-member
After a few trial and error - more emphasis on error - attempts at DYI modifications to the pumps and skimmer, I decided to take a step back and accurately draw out the whole situation. I'm still finishing my AutoCAD drawing of the sump (and surrounding stand). I want to make sure I haven't missed something and make sure that the pieces will all fit. Once that is finished and I'm sure I haven't missed anything I'll go back to building again. I'm hoping to make a lot of progress in Nov...
OP
OP
ZenMastr1968
Non-member
Well time and money have gotten away from me yet again.... typical with this hobby - n'est pas? I finished my drawing and decided that all the modifications to the design was a bit out of my league and would save this design for later in my acrylic building future.
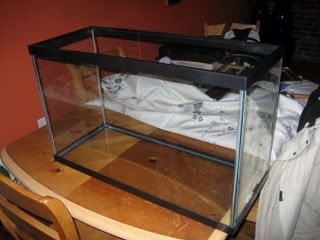
I took a closer look at the design and noticed that the rough shape ended up being pretty much identical to a standard 29 gal glass aquarium. So I picked up a fairly reasonably priced one around Christmas and am just going to go with that for starters. I'll still segment it like I was planning and just go with siliconed glass panels for the dividers. Instead of getting fancy and trying to cut "teeth" in the glass for the overflow of the fuge, I'll give a durso a try and just make a hole in that panel for a bulkhead.
With that said, anyone have any good contacts for 1/4" glass on the north shore?? and would it need to be 1/4" glass for the bubble trap and the one panel for the fuge? I assume so given the span and need for durability.... Thoughts?
NateHanson
Non-member
I think window glazing is a bit over 1/8", like 3/16, and that would be plenty thick, since the 29" is only 12" wide, right? 1/4" would be more durable to getting banged, but costs more. Either way, have the glass shop grind the edges for you so you don't cut your knuckles on the corners.
Looks nice!
Looks nice!
dedfish
That's Mr.Murphy to you!
I just finished my 29g sump for my 70Tech. I used a combination of egg crate and 1/8 acrylic. I'll add another piece of egg crate to cover the middle section and give a platform for the live rock to sit on. I'll be using an external skimmer so I didn't need a large skimmer section. This is loosely based on the duplex sump concept discussed here. The egg crate on the right baffle extends over the top of the acrylic to catch any macro or stuff that tries to flow over to the return section. The right baffle is also slightly sloped to let the water run down it rather than over it to free fall into the return section. I'll be using a Eheim 1260 for the return with 5 feet of head so the flow through the sump should be low and bubbles should not be a problem. The fresh water test didn't have any bubble problems.

OP
OP
ZenMastr1968
Non-member
I think window glazing is a bit over 1/8", like 3/16, and that would be plenty thick, since the 29" is only 12" wide, right? 1/4" would be more durable to getting banged, but costs more. Either way, have the glass shop grind the edges for you so you don't cut your knuckles on the corners.
Looks nice!
Yes, the panels would be roughly 12x18,but didn't what to take the chance of one breaking down the road (with cleaning, pump vibration, etc...) I would most definitely go with policed edges....
Dedfish - that's looking good! I'm still going to make the 3 chambers, skimmer, return pump, and fuge. I saw somewhere a design where they used a durso in the fuge instead of an over the edge return to the middle section, but I can't remember where I saw it now. So it would just be the 3 fairly identical, smaller pieces for the bubble trap and then the one, bigger separator panel for the fuge So I don't think it will be too much expense.
I'm going to run a deep bed ( 4+ inches) of the sugar sized sand in the fuge with live rock and cheato - lighted off cycle from the main lighting. I'll have a host of cleaners (snails, conche, etc...) in the fuge to keep it somewhat clean and healthy. I think I already have the larger Eheim pump - which in the end may turn out to be a bit much for the distance involved. The OceanRunner 2700 is doing nicely on the AquaC Urchin skimmer I have in the tub with the live rock I picked up months ago.
So, get these panels. set them, plumb, and water test it and we should be up and running pretty soon....
OP
OP
ZenMastr1968
Non-member
Well there has been a lot of progress over the last few weeks....
Here is what was waiting in the wings:
It's been so long that I can't remember how many pounds of LR that is .
.
Here's what I started with for my sump, standard ordinary 29gal glass tank....
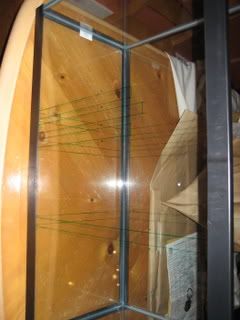
I marked out the locations for the glass partitions and gave myself 1/4" of space around for the silicone fillets. Where I had enough space, I taped the sections off.
Here is what was waiting in the wings:
It's been so long that I can't remember how many pounds of LR that is
.Here's what I started with for my sump, standard ordinary 29gal glass tank....
I marked out the locations for the glass partitions and gave myself 1/4" of space around for the silicone fillets. Where I had enough space, I taped the sections off.
OP
OP
ZenMastr1968
Non-member
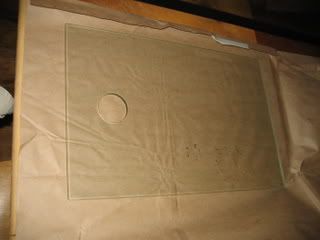
Here is the fuge end panel with a hole I had them cut for me to allow for a durso overflow in the fuge - all pieces are 1/4" plate glass.
Here is the completed sump, testing for soundness after buble trap siliconing attempt #2 - first try didn't hold more than about 1 inch of water in the skimmer section.... (skimmer on left, fuge on right, center return)
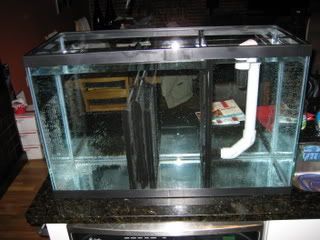
It's an 11" high skimmer section with 1 inch between the trap (over-under-over design).
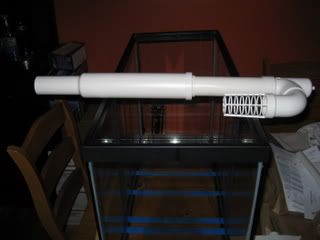
Here is a pic of the standard Oceanic durso that came with the tank - just for reference
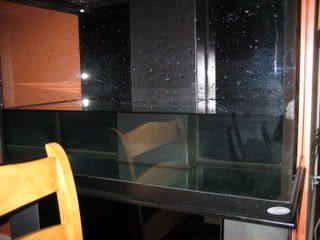
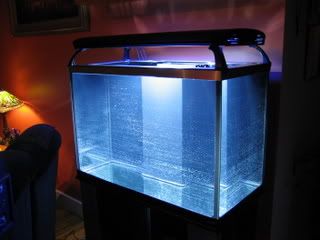
Now the tank was cleaned - had a year's worth of dust accumulation... filling to test for leaks.
Here is the completed sump, testing for soundness after buble trap siliconing attempt #2 - first try didn't hold more than about 1 inch of water in the skimmer section.... (skimmer on left, fuge on right, center return)
It's an 11" high skimmer section with 1 inch between the trap (over-under-over design).
Here is a pic of the standard Oceanic durso that came with the tank - just for reference
Now the tank was cleaned - had a year's worth of dust accumulation... filling to test for leaks.
OP
OP
ZenMastr1968
Non-member
Tank successfully full ...and below, same pic without the flash
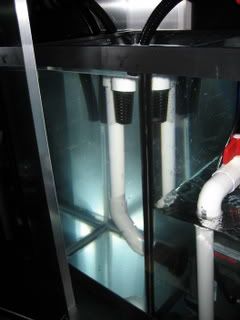
Now the sump was in place and I'd finally figured out all the plumbing...
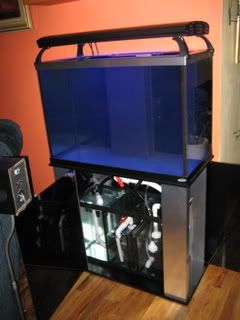
Ready to fire it up for the plumbing test!!!!
OP
OP
ZenMastr1968
Non-member
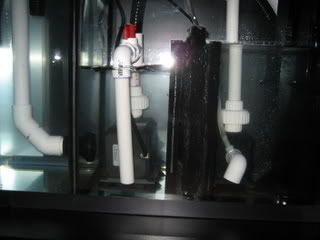
Here's some closeups of the plumbing:
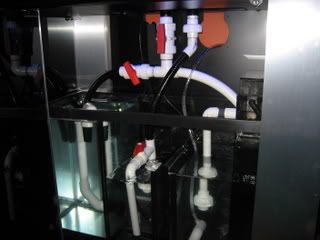
I tried to be a simple and neat with the design as possible. I needed to make a split drain one to each side of the sump and needed to be able to control the flow through the fuge section(left side of this pic).
Here is the right end of the sump which is the skimmer section. I have an AquaC Urchin Pro in there connected to an OceanRunner 2700 (needlewheel modified 2500).
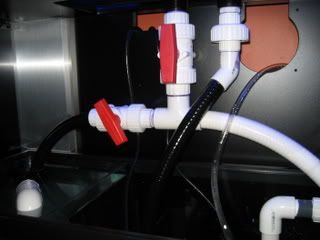
Here is the heart of the drain... Left side(drain) is a 1" true union ball valve (in case I need to shutoff the drain) into a 1" tee. Off of that, it reduced to 3/4" on the left with a 3/4" true union ball valve and some 3/4" spa-flex into the fuge (black). The white spa-flex is 1" and runs into the skimmer. I have the 3/4" valve tweaked back so there is a reduced flow into the fuge. Right side(return) is all 3/4" with a union at the top and black spa-flex off the 45 elbow into return loop off the top of the Ehiem 1262. I was originaly going to use the true union ball valves at the base of the tank, but there wasn't enough vertical to make it work well. I also figured that the 3/4" true union ball valve in it's current location would allow for easier cleanings of the drain and any changes/maintainence down the road...
Here is the durso on the fuge side. I was originaly just going to have a shorter wall on the fuge and just have the water spill over into the return section, but I was afraid it would make too much noise. You can also just see the top of the return loop so I can control how much water is flowing back into the display.
I tried to be a simple and neat with the design as possible. I needed to make a split drain one to each side of the sump and needed to be able to control the flow through the fuge section(left side of this pic).
Here is the right end of the sump which is the skimmer section. I have an AquaC Urchin Pro in there connected to an OceanRunner 2700 (needlewheel modified 2500).
Here is the heart of the drain... Left side(drain) is a 1" true union ball valve (in case I need to shutoff the drain) into a 1" tee. Off of that, it reduced to 3/4" on the left with a 3/4" true union ball valve and some 3/4" spa-flex into the fuge (black). The white spa-flex is 1" and runs into the skimmer. I have the 3/4" valve tweaked back so there is a reduced flow into the fuge. Right side(return) is all 3/4" with a union at the top and black spa-flex off the 45 elbow into return loop off the top of the Ehiem 1262. I was originaly going to use the true union ball valves at the base of the tank, but there wasn't enough vertical to make it work well. I also figured that the 3/4" true union ball valve in it's current location would allow for easier cleanings of the drain and any changes/maintainence down the road...
Here is the durso on the fuge side. I was originaly just going to have a shorter wall on the fuge and just have the water spill over into the return section, but I was afraid it would make too much noise. You can also just see the top of the return loop so I can control how much water is flowing back into the display.
OP
OP
ZenMastr1968
Non-member
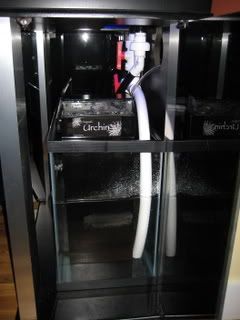
Here is a closeup of the return loop that I was talking about (center of the pic). There is a union on top the Eheim with a tee and a 3/4" ball valve and a 90 degree elbow. I can control how much water actually makes it into the display with the valve and not put any back pressure on the pump. Right now with the head loss and fitting loss, the valve is wide open and pretty much matching the rate of the drain.
The plumbing tests all went well - no leaks! There was a bit of noise from the water gurgling out the main drain in the skimmer, so I put a 90 degree elbow on the end of the white spa-flex (just twisted it on tight so I could take it back off if it didn't work like I wanted it to. I did the same to the fuge section so it didn't disturb the sand when it was fully operational. I emptied out all the plain water, wiped it all down again, rinsed it all with RO water and then set about adding the sand and LR.
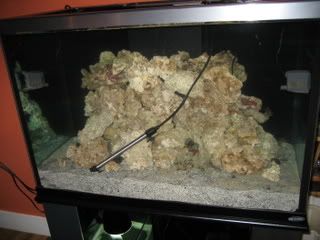
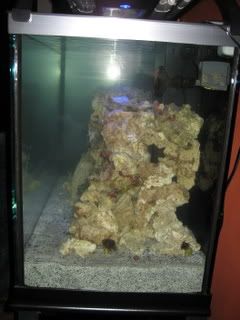
I was in such a flurry of activity arranging and pinning the LR, I forgot to take pictures of that part. Basically what I did was purchase a quantity of 3/16" acrylic rod from Tap Plastics and used a masonary bit to drill holes in the LR to pin it in place once I was happy with the organization. The clear rod is failry invisible and allowed for more intersting caves and ledges without the structure being too wobbly - plus I can take it back apart and change it up if I want. Here are some pics when the tank was mostly filled up.
Here is a closer shot of the front of the tank
Here is left side
And the right side
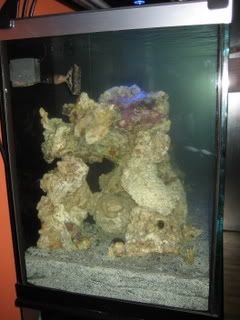
In these pics there was still a few pieces of LR left in the old 10gal so the final result is a tiny bit different. I particularly wanted a lot of small caves and crevices for the small fish I was planning on keeping as well as the pistol shrimp/goby pairing. I used a good percent of the old water from the existing tank, but made the bulk new salt water with RO/DI and Tropic Marin Pro Reef.
The plumbing tests all went well - no leaks! There was a bit of noise from the water gurgling out the main drain in the skimmer, so I put a 90 degree elbow on the end of the white spa-flex (just twisted it on tight so I could take it back off if it didn't work like I wanted it to. I did the same to the fuge section so it didn't disturb the sand when it was fully operational. I emptied out all the plain water, wiped it all down again, rinsed it all with RO water and then set about adding the sand and LR.
I was in such a flurry of activity arranging and pinning the LR, I forgot to take pictures of that part. Basically what I did was purchase a quantity of 3/16" acrylic rod from Tap Plastics and used a masonary bit to drill holes in the LR to pin it in place once I was happy with the organization. The clear rod is failry invisible and allowed for more intersting caves and ledges without the structure being too wobbly - plus I can take it back apart and change it up if I want. Here are some pics when the tank was mostly filled up.
Here is a closer shot of the front of the tank
Here is left side
And the right side
In these pics there was still a few pieces of LR left in the old 10gal so the final result is a tiny bit different. I particularly wanted a lot of small caves and crevices for the small fish I was planning on keeping as well as the pistol shrimp/goby pairing. I used a good percent of the old water from the existing tank, but made the bulk new salt water with RO/DI and Tropic Marin Pro Reef.
OP
OP
ZenMastr1968
Non-member
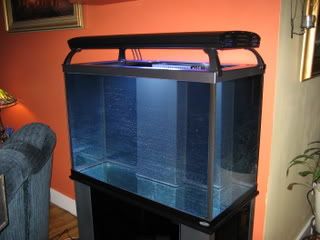
Here it is all full and operational. I relocated the heater to the sump, move the small powerheads I had in my 10gal over to the sides a bit and moved the inhabitants to their new home....

Here are a couple of pics with the moon lights on. I'm running the fuge light off cycle with the main lighting. It's a Aqualight Pro and the actinic's are running 8am to 8 pm with the 150 watt HQI metal halide running for 8 hours during the day.
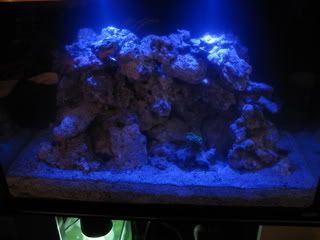
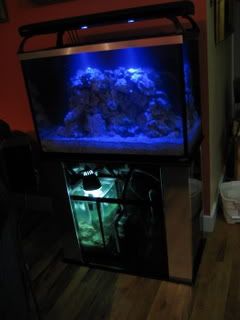
So far I'm very happy with the tank, it's a nice size and has a nice presence. I've got 2 maxi-jet 600s on the way to increase the flow in the tank - the 2 microjet 606's just aren't cutting it...
I'll take some better pics with my other camera when I get the powerheads replaced and update the thread. Thats all for now - I can finally relax a bit....")
Here are a couple of pics with the moon lights on. I'm running the fuge light off cycle with the main lighting. It's a Aqualight Pro and the actinic's are running 8am to 8 pm with the 150 watt HQI metal halide running for 8 hours during the day.
So far I'm very happy with the tank, it's a nice size and has a nice presence. I've got 2 maxi-jet 600s on the way to increase the flow in the tank - the 2 microjet 606's just aren't cutting it...
I'll take some better pics with my other camera when I get the powerheads replaced and update the thread. Thats all for now - I can finally relax a bit....
OP
OP
ZenMastr1968
Non-member
Thanks, I labored over that for the better part of a week - laying it out on the dinning room table. Then when it came time to put the plan into action, some things didn't work like I wanted to and it took the entire day to regroup and put it together.looks great,nice job on the plumbing,very neat.
I had some coral in my 10 gal that has already been migrated into the tank. The pieces were too big for the 10 but are lost in the 70...Looks Good Cant What 2 See With Coral
Current coral are:
- yellow tipped torch - got so big that I fragged the branches into seperate pieces (3 single head branches and 2 additional branches in the process of splitting it's head)
- zoo covered rock - can't remember what kind they were
- bright greeen star polyop - it grew and split into two pieces
- pulsing xenia
I had a cantaloupe sized ball in the HOB in my 10 gal that I moved over with the other stuff...so I'm all set, but thanks..Awesome man! Glad to see another 70tech get off the ground! Come by and take a look at mine and I'll hook you up with some chaeto!
On a side note, the sureflow 1600 modified maxi-jet 600s might be a bit much for the tank - last night they started burying some of the lower LR and torch corals. I have it on one of the coralife timers for wave making purposes - alternating time, one running at a time. They're rated at 1400 GPH - my math is quite a bit off now that I take another look at the numbers.
 Looks like I've got over 20 times turnover now (including the return) which I think is too much.
Will have to figure out something for that...
Similar threads
- Replies
- 6
- Views
- 2K
- Replies
- 24
- Views
- 4K
- Replies
- 8
- Views
- 890
Sponsors
Acro Garden
All Things Aquatic
Backwoods Reefs
Beantown Reefers
Blue Light Aquatics
Bull Reef Aquaculture
Classic Corals
Crazy Corals
Cultivated Reef
Daves Corals
Frag Freaks
Frank's Frags
Joe's Fishy Business
Love The Reef
Mofo Corals
NEMO
Ocean State Aquatics
On Point Corals
ReefBum
Reef Exclusive
The Coral Farm
Ultimate Corals
Wet Pets Emporium
WickedCoralGarden