55 Gallon Zoa Only Tank Build

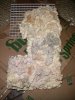
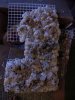
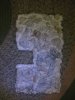
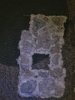
I am picking up a can to do some tests tomorrow. I will post the results. I am going with Great Stuff, just for its accessibility and the fact I don't need the black color, as 90% will be covered in rock anyway. I am thinking the rock should weigh it down enough to not worry about floating.
 
I just made a sample strip using Touch N' Foam. It was made clear to me that I should not trust the foam to either hold up rocks itself or with silicone. It feels as though it would tear away from the eggcrate. Perhaps it is still curing on the sample strip, but I don't feel that this is the way to attach the rock anymore. This should be used as gap filler only.
 
I ordered a 40 pound box of the fiji smartstart marco rock so I should be finishing my wall next weekend. I did the two small side strips as and it worked out well, it just needs some cleaning up around the edges. I am thinking of using a 20 gallon frag tank and one of these instead of a refugium: http://www.algaescrubber.net/forums/viewtopic.php?f=9&t=36

Has anyone tried this before? I am hesitant to jump right into it without knowing someone who has before.
 
Here are some pictures of the right side I started today. It holds the big rocks like cement... no problems at all. I am going to try to use less foam on the rest. This is a little less than a half a can of foam here. I will pick some more up tomorrow. Touch ups will be done sometime soon too. The edges clearly need shaving.
 

Attachments

  • IMG_0454.jpg
    IMG_0454.jpg
    84.9 KB · Views: 501
  • IMG_0452.jpg
    IMG_0452.jpg
    86 KB · Views: 510
hey about the algae scrubber thing. i have herd mixed reviews..... some people sware by them and some people hate them....
 
Thanks, I will post some finished product pictures tomorrow for at least that piece.


Do you have any sources where you read this? What were the haters saying?

the haters just were saying this did nothing for my tank..... just use a fuge.. stuff like that. i cant remember what site i was on where i read that..... if i remember ill send it to you
 
Here is the finished side from yesterday, the opposite side and half of the back. I am awaiting the rest of my marco rock to do the last half of the back.
As you can see, the right side of the back is left free of rock because the side wall has so much rock I didn't want them interfering with each other. The last thing I need is for them to be done and ready to go and then not fit properly :eek:

I still need to shave the excess and put the sand on.
 

Attachments

  • IMG_0455.jpg
    IMG_0455.jpg
    80.4 KB · Views: 464
  • IMG_0456.jpg
    IMG_0456.jpg
    70.1 KB · Views: 468
  • IMG_0457.jpg
    IMG_0457.jpg
    84.6 KB · Views: 465
Still waiting for the epoxy to arrive, but I got my fiji smartstart marco rock. It is so light that I was able to put whole rocks on without breaking them up. Here are some pictures of the final product minus the sanding and the rest of the rockwork. I also made a nice centerpiece that will probably not even fit inside along with a smaller piece that will go into the tank.

Not the greatest pictures...
 

Attachments

  • IMG_0458.jpg
    IMG_0458.jpg
    83 KB · Views: 411
  • IMG_0462.jpg
    IMG_0462.jpg
    73.3 KB · Views: 411
  • IMG_0463.jpg
    IMG_0463.jpg
    88.1 KB · Views: 405
  • IMG_0465.jpg
    IMG_0465.jpg
    87.8 KB · Views: 404
  • IMG_0466.jpg
    IMG_0466.jpg
    86.1 KB · Views: 397
Well here is the finished sanded product with the two back walls siliconed to the back glass. The two sides will be pushed over a few inches upon final installation. I have also figured out my other rock work and it is placed in the picture as well. I want a lot of swimming space for fish so it doesn't look overcrowded. This decision made me sacrifice my nice rock sculpture, but for my next upgrade I will have it ready to go!

I have also been doing some parts purchasing over the past few weeks. Not pictured is my new Typhoon RO/DI unit and my incoming Reefkeeper Lite Level 3. Pictured is my Tunze Osmolator for auto top off. I went with this product over others due to the better reviews and ease of mind. When this tank is finished I need to be able to leave for a weekend without thinking twice. The goal is to be able to let the tank be for a week without any worries!
 

Attachments

  • IMG_0468.jpg
    IMG_0468.jpg
    74.9 KB · Views: 391
  • IMG_0472.jpg
    IMG_0472.jpg
    82.6 KB · Views: 366
  • IMG_0474.jpg
    IMG_0474.jpg
    85.1 KB · Views: 364
  • IMG_0475.jpg
    IMG_0475.jpg
    91.3 KB · Views: 363
  • IMG_0473.jpg
    IMG_0473.jpg
    56.7 KB · Views: 379
Back
Top