You are using an out of date browser. It may not display this or other websites correctly.
You should upgrade or use an alternative browser.
You should upgrade or use an alternative browser.
55 Gallon Zoa Only Tank Build
- Thread starter fishindude
- Start date
OP
OP
Well today I filled the tank up with water and added some equipment.
Good news: -It looks good! There are a few kinks that I need to work out (see bad news) but overall I am happy with the appearance.
-Everything works so far, although the refugium is yet to be installed.
Bad news: -First off, both my side walls are on a lean which I find distracting but I hope that after I can see inside the tank again I am able to straighten them out a bit.
-My left side wall is buoyant! Fortunately it is such a tight fit between the other wall and my glass that it holds itself up, but, as seen above, it is currently on a lean.
-My glass tops won't fit on with my overflow box, so I will have to work on those some more as well.
Pictures will come later this week when I head back up to fix the bad news and do some maintaining. I am hoping to get the refugium up and running either by the end of this week or right after my vacation as well.
Well today I filled the tank up with water and added some equipment.
Good news: -It looks good! There are a few kinks that I need to work out (see bad news) but overall I am happy with the appearance.
-Everything works so far, although the refugium is yet to be installed.
Bad news: -First off, both my side walls are on a lean which I find distracting but I hope that after I can see inside the tank again I am able to straighten them out a bit.
-My left side wall is buoyant! Fortunately it is such a tight fit between the other wall and my glass that it holds itself up, but, as seen above, it is currently on a lean.
-My glass tops won't fit on with my overflow box, so I will have to work on those some more as well.
Pictures will come later this week when I head back up to fix the bad news and do some maintaining. I am hoping to get the refugium up and running either by the end of this week or right after my vacation as well.
when you add the sand it will make it sink. and it should straiten it to......
about the tops- you could but a class cutting tool and just notch them out.
CANT WAIT FOR PICS
corey
OP
OP
when you add the sand it will make it sink. and it should straiten it to......
about the tops- you could but a class cutting tool and just notch them out.
CANT WAIT FOR PICS
corey
You'd think the sand would help, but even with the sand it floats. I am shocked as the rocks I used for it are pretty heavy too.
As for the tops, luckily I have the necessary tools to notch them out as you said. Pics to come
")
OP
OP
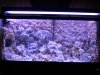
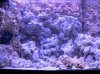
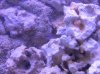
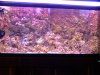
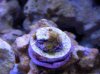
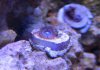
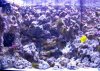
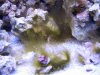
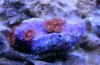
Well, it's been a while since I've updated and thought I'd snap some pictures to show my progress. It's almost done! I am still working on the skimmer though. I have put in a few zoanthid frags and they seem to be doing okay, but I will have a better idea tomorrow.
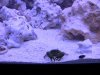
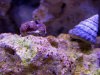
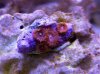
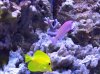
First picture is the full tank shot, then the left and right sides up close. After that I have my emerald crab and then my tailspot blenny.
First picture is the full tank shot, then the left and right sides up close. After that I have my emerald crab and then my tailspot blenny.
Attachments
OP
OP
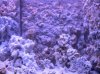
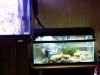
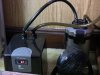
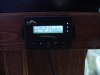
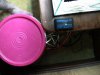
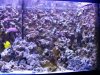
Here are some more... First two are my refugium to the right of my DT. Then I have my chiller hooked up through my canister filter with a fan to blow away the hot air. Everything is running through my Reefkeeper Lite (level 3) and finally I have my ATO (tunze osmolator) hooked up and running.
Attachments
OP
OP
tank looks beast!!
Thanks Corey!
Thanks Corey!
still have the like 3 other tanks you had set up still? or are you combining them all?
and what kind of light is on the fuge?
OP
OP
still have the like 3 other tanks you had set up still? or are you combining them all?
and what kind of light is on the fuge?
No, my 20 long is gone, the light from that tank (30 inch aqualight PC) is on the fuge. The 29 is still up, I had been using it as a frag tank while this went up but in the next couple weeks I will be passing that onto my dad as I move my corals in.
Edit: Well actually the entire 20 long IS the fuge i should say...
cool!
OP
OP
Update
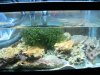
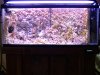
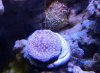
It's been a while... Here are a few pictures of the progress. The first two are the tank from a month ago and then then today.
It's been a while... Here are a few pictures of the progress. The first two are the tank from a month ago and then then today.
Attachments
OP
OP
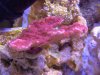
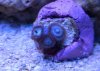
Had to add this one. I will try to add more when the bright daylights go off, but actinics I have a hard time shooting pictures under.
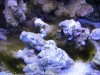
The only problem I have now is the growth of algae, some hair algae in particular, but not like I have experienced before. It is shorter and each strand is thicker and more brown looking than the green hair that I am used to (that I also have a little bit of)
The only problem I have now is the growth of algae, some hair algae in particular, but not like I have experienced before. It is shorter and each strand is thicker and more brown looking than the green hair that I am used to (that I also have a little bit of
)Attachments
OP
OP
Looks great Torey! I'm gonna have to be getting some zoas from you soon.
Thanks Peter! I am always trying to expand my collection
It's a little too late now, but when I did my rock wall, I filled a square with a putty style epoxy about every 10", Then I put a dab of silicone over the epoxy and used this to secure my walls.
OP
OP
It's a little too late now, but when I did my rock wall, I filled a square with a putty style epoxy about every 10", Then I put a dab of silicone over the epoxy and used this to secure my walls.
That is a good idea. I would have also liked to epoxy the center gap now looking back. I know better for next upgrade though
OP
OP


OP
OP

OP
OP
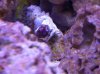
These last few highlight my problem thus far... hair algae and some bubble alage appearance over the last couple months. I have added a better cleanup crew and they are working on it. I have been using Reef Biofuel and MB7 together for at least a month. Skimmer production has increased a lot, and I see clearer water but that is about the only difference.
Attachments
Similar threads
- Replies
- 2
- Views
- 782
