DIY OverFlow Box

Doherty

Non-member
I have recently been looking on-line at a well known site that sells premade overflow boxes, glass cutting bits etc, for the price around $75 for the kit and I felt it was worth a try attempting to do it myself for less money. Lets see if I am able to, keeping In mind I plan to make 2 of these for a side-by-side 20g High set-up's. I will note the cost of materials purchased to keep track.

I have never done this before so lets see how they comes out.

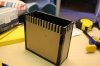
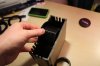
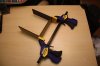
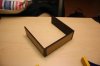
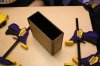
I plan to duplicate the dimensions of the box, as well as the bulk head size. It will be 6"x2"x6" with a 1.5" bulkhead. For the site, it rates the box around 700 gph. Very overkill for the flow rate for the system, definitely don't plan on putting that much water through it, but wanted to be on the safe side to decrease the chance of an overflow of the tank. I am making these boxes so they are able to be removed if needed/can use in other systems if needed, so I wont be siliconing these to the tank.

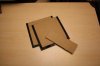
1. 3/16 Black Acrylic 12"x24" $18 (which includes shipping) this should be enough for the 2 overflow boxes as long as I don't mess it up

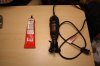
2. 5 oz tube # 16 Weld-on $8

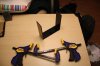
3. High speed plastic cutter for my Dremel $5

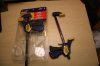
4. Pack of 4, 6" clamps $20 ...... prob a good idea to get 6 clamps

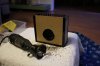
5. High speed Diamond Bit for Dremel $ 11 (works great but is very slow process for cutting hole in glass) Prob worth picking up diamond hole cutter

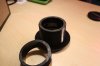
6. 2, 1.5" bulkheads $24

Total purchase price............ $ 84 for materials for both...... $42/Overflow box, not bad

This would have cost me over $150 to purchase 2 overflow boxes. That is a huge price difference........ as long as you don't mind doing the work your self.

Pictures to come!
 
Pics of some of the materials
 

Attachments

  • IMG_1485e.JPG
    IMG_1485e.JPG
    49.2 KB · Views: 1,824
  • IMG_1487e.JPG
    IMG_1487e.JPG
    48.3 KB · Views: 1,842
First I started by cutting all the pieces to size with my dremel/plastic cutting bit. Making sure to label all sides and noting on the paper backing "top", "side" etc.... also Indicating the direction they go. Also trimmed the paper around the edges with a razor knife.
 

Attachments

  • IMG_1486e.JPG
    IMG_1486e.JPG
    39.8 KB · Views: 1,836
First parts I joined was the bottom and the two sides together. I first cleaned all the joining edges with rubbing alcohol, let dry, and applied a small bead of #16 weld-on along the edges of the bottom piece and pressed the side walls against them, then applied the clamps.

This stuff doesn't set up that fast so you do have a few minutes to play with the edges to align them before you apply the clamps.
 

Attachments

  • IMG_1488e.JPG
    IMG_1488e.JPG
    44.8 KB · Views: 1,809
I let these set in the clamps for 24 hrs then I removed them.
 

Attachments

  • IMG_1490e.JPG
    IMG_1490e.JPG
    39.9 KB · Views: 1,805
  • IMG_1489e.JPG
    IMG_1489e.JPG
    50.2 KB · Views: 1,811
Applied the front and back of the overflow box in the same way as previous step. Note I only have the 4 clamps....... would be a good Idea to have purchased 2 more to go along the bottom. But I have good clean cuts so I dont think it will be a problem. It appears to be tight against the seam.
 

Attachments

  • IMG_1491e.JPG
    IMG_1491e.JPG
    54.5 KB · Views: 2,667
Next step is to cut the teeth in the front and side pannels with dremel tool, and cut out the hole for the bulkhead...... Probably would be easier to do before you put the box together, but will do that for my next one I make. Will post more progress tomorrow.
 
Thanks Barry!....... Got the idea to just make overflow boxs myself from you, figured this thread may help others.... And show that this can be pretty inexpensive to Just do it yourself.
 
Spent about 22 hrs in clamps......... Will cut the teeth, and hole for bulkhead tomorrow.
 

Attachments

  • IMG_1492e.JPG
    IMG_1492e.JPG
    47.4 KB · Views: 1,760
  • IMG_1493e.JPG
    IMG_1493e.JPG
    52.4 KB · Views: 1,751
Nice Job Matt!

Really impressed you did that with a dremmel.

Did you clamp on a straight edge to follow? I assume you did, just thought I would put that question out there for those that were wondering.
 
Nice Job Matt!

Really impressed you did that with a dremmel.

Did you clamp on a straight edge to follow? I assume you did, just thought I would put that question out there for those that were wondering.

Thanks Jen!

Yeah that was one thing I forgot to mention........... I did clamp on a straight edge and ran the dremel along the edge, which was the only way I would be able to get a straight cut with the dremel tool.
 
Last edited:
Where is the photo of the finished product?????? You know you got up super early to sit there and wizzzzzz wizzzzzzz zzzzzzz zzzzzzzzzzzz with the dremel to finish up:D.
 
Yeah really Matt. All that is is a tease LOL. Have anything you want to trade seeing as you are less than Two mins from my town?? i have a few zoas that are ready to get trimmed back a bit... Let me know
 
Where is the photo of the finished product?????? You know you got up super early to sit there and wizzzzzz wizzzzzzz zzzzzzz zzzzzzzzzzzz with the dremel to finish up:D.

Sorry to leave you in suspence Barry! :)
I'm working 7a-7p today..... Will work on it later tonight
On my lunch break now.

Yeah really Matt. All that is is a tease LOL. Have anything you want to trade seeing as you are less than Two mins from my town?? i have a few zoas that are ready to get trimmed back a bit... Let me know

I don't have anything right now..... But will let you know.
 
So I finally got to cutting the teeth...... Ended up using the table saw with a very fine tooth blade, says on the blade "For use on plactics...... etc". It would definitely been easier if I had cut the teeth prior to constructing the box. Not too happy how the teeth came out but, it will do the job none the less.
 

Attachments

  • IMG_1495e.JPG
    IMG_1495e.JPG
    48 KB · Views: 1,673
Also one thing to take into consideration when making a low-profile box like this it to make sure you get a short bulkhead. Notice how I did not think of this before.
 

Attachments

  • IMG_1500e.JPG
    IMG_1500e.JPG
    46.9 KB · Views: 1,666
A quick measure and a very slow...... careful cut on the table saw.... made the fix.
 

Attachments

  • IMG_1501e.JPG
    IMG_1501e.JPG
    38 KB · Views: 1,600
  • IMG_1502e.JPG
    IMG_1502e.JPG
    42.9 KB · Views: 1,622
Now time to cut out the hole for the bulkhead in the back of the overflow box. Used the dremel with plastic cutting bit. Measured and traced the hole prior to making the cut.
 

Attachments

  • IMG_1503e.JPG
    IMG_1503e.JPG
    51.3 KB · Views: 3,737
Back
Top