My basement sump project

stingythingy45

Well-Known Member
Moderator
BRS Member
I've been wanting to shoot to the basement with a sump since I got my tank almost a year ago.I have a perfect room for it directly under my LR where the tank sits.Just had to move a lot of stuff that will need shelves,but that's a later project.:p
So recently I've been spending a good part of my nights in the basement.
I purchased a 70 gallon stock tank and a GenX Mak4.Also purchased a bunch of lumber and of coarse PVC.Everything is basically plumbed with ridged PVC.
Mostly because I was too lazy and cheap to drive to Lowes.I've taken a bunch of Idea that I found here and on RC to help with this set up.
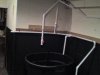
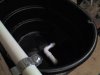
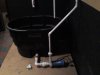
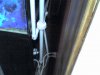
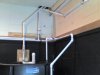
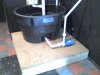
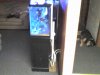
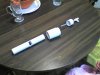
Here's a couple pictures of the tank/plumbing.It's kind of fuzzy because of the lighting and the cell phone pictures.It's a small room 10 x 5 ft. and actually brighter than the pictures.I plan to hang a few more lights anyways to brighten it up..
It's not finished as I'm going to make up a reverse durso(thanks Greg) for the overflow return.The pipe leading to the right is coming off the overflow side for the refugium.The extended pipe leading to the door will have a fawcet that I can attach a hose to dispose of old SW out a basement window.
 

Attachments

  • 03-19-08_0646.jpg
    03-19-08_0646.jpg
    83.3 KB · Views: 1,519
  • 03-19-08_0647.jpg
    03-19-08_0647.jpg
    83.8 KB · Views: 1,342
  • 03-19-08_0648.jpg
    03-19-08_0648.jpg
    91.5 KB · Views: 1,447
That looks great. Basement sump was the best thing I ever did for my tank when it was running. Takes all of the ugly and loud things away form the living area so we could enjoy the tank more!
 
Thanks,

I'm getting excited about trying it out.
I tested out the lower plumbing by looping it back to the sump the other day.
Everything was water tight down there.
I hear you on the noise and clutter Jill or Brian.
I must admit when I first strated to drill the holes and run the PVC I said to myself(oh Bob..........what are you doing?".lol...I'm going to try and make this as user friendly as possible.Shelves and a work area will be next after an upgrade to the lighting.
 
Think about rigging something with filter socks on your drain to eliminate microbubbles and mechanically filter your water.

your setup looks way less ghetto than mine already :D
 
Thanks Jay,it's a lot of work.I thought it wouldn't be so involved.
I was thinking of doing a reverse durso like Greg mentioned in another post.I asked about plumbing and where to put the return.And I liked that idea to slow the water down and redues bubbles.I'm not sure where or if I could put a filter sock there.Maybe I can trap it between the durso(2" PVC) and the downspout and have it hang in the durso_Or make a piece that will fit in the durso that I can get to through the top cap.That part of it will just be pushed together and not glued.
The sump is sitting on a 4 x 4 by 3/4 inch plywood platform on 2 x 6 frame.
I thought about puting it up on legs but didn't want to get the sump up too high.
 
Thanks,

I finished up the plumbing last night and started to mix up some saltwater in the sump.I still need to wire up a GFCI and hang a better light down there.
I'll probably send water up to the display tonight or tomorrow.I have to get my heater in there and get the water warmed up and get all the parameters to match the display.Everything is plumbed with ridged right up to the overflow.I read some post by Nate about hose barbs and wanted to avoid any restrictions like that.I'm not sure how the return T is going to work.Might get more flow out on side than the other.It's not big deal as I could add ball valves or possibly one of those squids.I want to start building a stand/shelves with storage for the refugium next.
Here's a few more pictures.
 

Attachments

  • 03-19-08_BTP.jpg
    03-19-08_BTP.jpg
    85.4 KB · Views: 1,177
  • 03-19-08_CS.jpg
    03-19-08_CS.jpg
    79.4 KB · Views: 1,153
  • 03-19-08_FS.jpg
    03-19-08_FS.jpg
    92.4 KB · Views: 1,172
  • 03-19-08_MS.jpg
    03-19-08_MS.jpg
    88.5 KB · Views: 1,180
Oh.......and my dog resting after all the hard work.:rolleyes:
 

Attachments

  • 03-19-08_D.jpg
    03-19-08_D.jpg
    89.6 KB · Views: 1,228
Started it up the other day and everything is working great.
Installed the high water safety switch in the display from autotopoff yesterday.My only issue is when I tested the switch the pump kept coming on and off.I even moved my anti-siphon holes in the returns to above the waterline.The the switch seem to be so sensitive it takes very little to rigger it on and off.Also I had an issue with overflow noise.I ended up throttling back the overflow pipe a little to slow the water down.
The overflow is rated for 800 GPH and my pump is capable of beating it if not throttled back a little.I'm running the sump about half full right now.Plan to add more water today.I'll have a few more pictures Monday.
 
I'm not sure where or if I could put a filter sock there.Maybe I can trap it between the durso(2" PVC) and the downspout and have it hang in the durso_Or make a piece that will fit in the durso that I can get to through the top cap.That part of it will just be pushed together and not glued.

You don't put the filter sock in the plumbing at all. What you would do is hang it in your sump so the drain line dumps into it. You could even hang it from your pipe if its supported well enough. Big thing is keep it away from the edges of you sump so if it gets clogged it overflows into the sump and not on your floor.
 
Last edited:
I zip tied on a whisper filter sock onto the bottom of the 2" PVC before I fired it up.Seems to work really well and breaks all the microbubbles.Strange thing about this,I expected tons of microbubbles when I first fired it up Friday.
But I got absolutely zero in the display.

PMed back......
 
not familiar with the whisper filter socks, but if you have it zip tied tight to the 2" pipe and there is no where for the water to overflow if the bag gets clogged it could flood your display. What I would do is get a 4" bag and using zip ties or string, hang it off of the Tee you have on your drain pipe (If Im understanding your pictures correctly) Any over flow will go straight to your sump. You should be able to find a 4" sock for $6-8. Id get a couple. After a few rinsings they no longer come clean. Then you can swap them out, toss them in the washer with some bleach (no detergent) and do an extra rinse cycle. I usually then put them in a bucket with some RO and test for chlorine before reusing, but the extra rinse is usually enough.
 
not familiar with the whisper filter socks, but if you have it zip tied tight to the 2" pipe and there is no where for the water to overflow if the bag gets clogged it could flood your display. What I would do is get a 4" bag and using zip ties or string, hang it off of the Tee you have on your drain pipe (If Im understanding your pictures correctly) Any over flow will go straight to your sump. You should be able to find a 4" sock for $6-8. Id get a couple. After a few rinsings they no longer come clean. Then you can swap them out, toss them in the washer with some bleach (no detergent) and do an extra rinse cycle. I usually then put them in a bucket with some RO and test for chlorine before reusing, but the extra rinse is usually enough.

Well,it's really just a filter pad that Whisper filters use.It's kind of like a pocket deal.I had a few laying around and didn't have any filter socks so I used that.The T that I have on the reverse Durso has a cap on it with a hole drilled in it now.I lightly put the cap on as well as the rest of the durso is pressed together not glued.I have a high water cut off switch in the display from form autotopoff to twart off any overflows.
Thanks for the info on the filter socks.It certainly makes sense to reuse them.
Glad i'm getting some input on this project.:)I'll try and snap a few more pictures tonight.
 
Stockman stand pipe

Last night I spent some time making a stockman stand pipe for my overflow.
The noise isn't bad at all with the standard tube,but heard lots of good things about how quiet the stockman's are.Here's a few pictures of it layed out and then in the overflow.
The shroud part is a reducer and coupling(I couldn't get it apart for the picture)plus wanted to try it out.:eek:
I literally screwed with this thing for at least 3 hours with no real luck.:confused:Tried all different config's.I didn't glue it so I could cut more or drill more holes.Ended up putting the original tube and filter sponge back in........much better.I also made a top for the sump out of ridged foam insulation.And one of the reverse durso breaking up any bubbles.Still need to fill ur up more.
 

Attachments

  • 03-24-08_stockman 1.jpg
    03-24-08_stockman 1.jpg
    37.1 KB · Views: 1,883
  • 03-24-08_stock2.jpg
    03-24-08_stock2.jpg
    84.7 KB · Views: 1,631
Looking good Stingy. I wish I had a large basement sump. Oh wait all of my tanks are in my basement already. Maybe I could make a sub basement sump.
J/k LOL
 
Back
Top