Any one want to build Euro-type skimmers together?

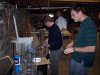
Nice Day guys! Thanks to everyone for contributing their experience, beer, and chili!

We got 4 skimmers about 80% done. What remains it installing the plumbing for pump and drain, and attaching the bottoms (as well as gluing various PVC parts together).

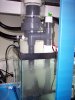
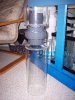
Here's my skimmer, which is pretty typical of the bunch. Not bad, eh?
 

Attachments

  • skimmer.jpg
    skimmer.jpg
    93.1 KB · Views: 689
Nate -

Thanks a bunch for opening your home and your shop up to all of us yesterday. Dean and I had a great time. Sorry we had to bail out before we completed the skimmers. I can't wait to start them up and see the foam!

Kim
 
No problem Kim. your skimmer is basically at the same stage as the picture above. The union needs glued to the top of the body, and it needs a bottom and a cap. Also needs drilled for the plumbing.
What size rectangle do you want for the base. I'll cut that and a top out for you so all the parts are done.

Nate
 
Now that's a real PVC union, Nate.

I'm glad I was able to make it for part of the build - it was great to meet everyone and share some acrylic happiness. My skimmer is now a bit jealous as it lacks the key "thermo-forced" funnel top. But, I still gots my keyway flanges, so there.

Looking forward to seeing a pic of Cindy and Eliot's RocketTube(tm) skimmer once it's done. When your skimmer is significantly larger than your child, you know you have a REAL skimmer.

Take care all,

Jeff
 
very nice job guys. Man am I jealous. I wish I had the time to participate :) .
 
By the way, thanks especially to the guys that came just to lend their experience, and worked on skimmers that aren't even for them. Mark and Jeff, you guys were great.

Nate
 
I'm glad everyone's so envious, even before a single one of these skimmers has hit water! :)

If others want to build these skimmers (perhaps after we see whether they work) I'll be happy to share a parts list, and how we did things.

Nate
 
Just wanted to update everyone and let you know I got the Sedra 5000 pump from aquadirect. Seems to be the right one. I haven't tested it yet but so far so good.

Kim
 
cool.
Kim, sounds like Matt and Ryan are going to work on skimmers up here on Friday. Thought I'd let you and Dean know. You're welcome to join us if you're free and want to finish up.
 
I don't think I can come up Friday. I friend is comming in from Chicago.

Also Nate I asked Dean about the size of the base. He said he left a piece of black acrylic and the size was written on it. But he said it was 7x12.

Thanks again Nate for all your hospitality and help.

Kim
 
Ok, well I finally got mine plumbed and running and it looks AWESOME. I've got it skimming in saltwater I just took out of my tank (from a water change) and it is kicking a**. I ended up making a needlewheel impeller from a bioball (thanks John at Living Seas!) because it only took about 5 minutes, so I figured, what the heck.

Here's some pictures from the group building, and a few pictures of the finished products.
 

Attachments

  • Euro-Nate.jpg
    Euro-Nate.jpg
    77.2 KB · Views: 621
Here's Santa's workshop. (Elves: Eliot, Ryan "piscevore", and Matt "mattn007")
 

Attachments

  • productionline.jpg
    productionline.jpg
    82.5 KB · Views: 633
Our little helpers, Abby and Lilja.

That enormous structure they're admiring is Eliot and Cindy's skimmer, model WMD.
 

Attachments

  • kids.jpg
    kids.jpg
    81 KB · Views: 615
Here's the impeller for my viaAqua 2600 pump with the vanes cut off, and a bioball with the back cut off, a hole cut in the middle, and the pins trimmed to about 3/8" long. This was really easy, and somehow doesn't really cut down on the output of the pump.
 

Attachments

  • needle-wheel.jpg
    needle-wheel.jpg
    47.4 KB · Views: 612
Hey Nate in that first pic it look's like an acrylic reducer. what did you guy's use?
they look well built...
 
That's the piece de resistance (sp?) of the whole design. We heat formed sheet acrylic into a bowl shape for the top of the reaction chamber because I didn't want to have a flat top on the reaction chamber, effectively blocking 2/3 of the bubbles from rising into the neck. It was actually pretty easy once we got it worked out. I turned a female form in wood, and after heating 3/8" acrylic for about 3 minutes with a torch, we pushed it into the mold with a glass peanut butter jar by putting the whole arrangement in a bench vise.

Those pieces were then routed round with a 6" pattern, and a 1/8" rabbet was cut on the underside so they fit inside the edge of the 6" tube as well as on top, to provide more structural strength and glue surface.
 
Last edited:
Back
Top